728x90
반응형


이번 수요일(2025년 3월 12일)에 발표되었습니다. 1B, 4B, 12B, 27B의 4가지 크기로 출시되었으며, 사전 학습된 버전과 지침 미세 조정된 버전이 있습니다. 모델 4B, 12B, 27B는 확장된 컨텍스트 창(최대 128K)과 다중 모달리티를 제공합니다.


Macbook M1 + Ollama + gemma3 로 Multimodal 이미지 처리를 테스트해보겠습니다


Ollama Gemma3


Gemma is a lightweight, family of models from Google built on Gemini technology. The Gemma 3 models are multimodal—processing text and images—and feature a 128K context window with support for over 140 languages. Available in 1B, 4B, 12B, and 27B parameter sizes, they excel in tasks like question answering, summarization, and reasoning, while their compact design allows deployment on resource-limited devices.


Gemma는 Google이 Gemini 기술을 기반으로 개발한 경량 모델 계열입니다. Gemma 3 모델은 멀티모달 모델로, 텍스트와 이미지를 처리할 수 있으며 128K 컨텍스트 윈도우를 제공하고 140개 이상의 언어를 지원합니다. 1B, 4B, 12B, 27B 파라미터 크기로 제공되며, 질문 응답, 요약, 추론과 같은 작업에서 뛰어난 성능을 발휘합니다. 또한, 컴팩트한 설계로 인해 자원이 제한된 장치에서도 실행할 수 있습니다.


더욱 상세한 모델 설명을 보고자 한다면 "Gemma 3 기술 보고서 ​​PDF"를 참고하세요.


Models


Text

- 1B parameter model (32k context window)

Multimodal (Vision)

- 4B parameter model (128k context window)

- 12B parameter model (128k context window)

- 27B parameter model (128k context window)


Default 모델은 4B 모델이고 1B는 text 이고 4B 사이즈부터 Multimodal 모델입니다. 4B 모델을 받습니다.


ollama run gemma3:4b

dongsik@dongsikleeui-MacBookPro % ollama run gemma3:4b
pulling manifest
pulling 377655e65351... 100% ▕█████████████████████████████████████████████████▏ 3.3 GB
pulling e0a42594d802... 100% ▕█████████████████████████████████████████████████▏  358 B
pulling dd084c7d92a3... 100% ▕█████████████████████████████████████████████████▏ 8.4 KB
pulling 0a74a8735bf3... 100% ▕█████████████████████████████████████████████████▏   55 B
pulling ffae984acbea... 100% ▕█████████████████████████████████████████████████▏  489 B
verifying sha256 digest
writing manifest
success
>>> Send a message (/? for help)


설치 확인

dongsik@dongsikleeui-MacBookPro % ollama --version
ollama version is 0.6.0
dongsik@dongsikleeui-MacBookPro % ollama list
NAME                        ID              SIZE      MODIFIED
gemma3:4b                   c0494fe00251    3.3 GB    41 minutes ago
dongsik@dongsikleeui-MacBookPro %


첫번째 이미지 분석입니다. 


멋지고 쿨한 선글라스를 쓴 3마리 고양이입니다.

사진에서 어떤 설명을 하는지 먼저 볼까요? 우선 영어로 질문해보겠습니다 "Describe what you see in this picture"

안경을 쓴 멋진 고양이 3마리 - 출처:  vecteezy 의 yganko


dongsik@dongsikleeui-MacBookPro % ollama run gemma3:4b
>>> Describe what you see in this picture vecteezy_three-cool-cats.jpg
Okay, I've analyzed the image vecteezy_three-cool-cats.jpg. Here's a description of what I see:

**Overall Impression:**

The image is a playful and vibrant digital illustration featuring three stylized cats.
It has a cartoonish, slightly retro feel, likely intended for a fun or whimsical design.

**Detailed Description:**

*   **Subject:** There are three cats, each with a distinct style.
    *   **Cat 1 (Left):** This cat is a bright, almost neon blue with a sleek, modern design.
        It has large, expressive eyes and a confident pose, looking directly at the viewer.   
    *   **Cat 2 (Center):** This cat is a vibrant pink with a more rounded, friendly appearance.
        It has a slightly mischievous expression and is playfully leaning forward.
    *   **Cat 3 (Right):** This cat is a bright yellow with a more geometric, almost robotic-looking 
        design. It has a slightly tilted head and a curious expression.

*   **Style:** The illustration is clearly digital and stylized. 
    The lines are clean and bold, and the colors are saturated. 
    It resembles a vector graphic, which means it can be scaled up or down without losing quality.

*   **Background:** The background is a solid, dark gray, which helps the bright colors of the cats 
    to pop.

*   **Composition:** The cats are arranged in a horizontal line, with the central cat slightly closer
    to the viewer.

*   **Overall Tone:** The image has a cheerful and energetic tone. It's designed to be appealing and fun.

**In essence, it's a cute and colorful digital illustration of three stylized cats, 
  likely intended for use in a graphic design project.**

Would you like me to focus on a specific aspect of the image, such as the style, color palette, 
or potential uses for this illustration?

>>> Send a message (/? for help)


Macbook M1에서 처리속도는 꽤 빠릅니다. 최초 질문에 응답하는데 20초 정도에 위 설명을 마쳤습니다.

>>> 이 그림에서 보이는 것을 한글로 설명하세요 vecteezy_three-cool-cats.jpg
네, vecteezy_three-cool-cats.jpg 그림에 보이는 것을 설명해 드리겠습니다.

이 그림은 세 마리의 귀여운 고양이 그림입니다. 각 고양이는 다른 색깔과 스타일을 가지고 있습니다.

*   **왼쪽 고양이:** 밝은 파란색으로, 세련되고 현대적인 느낌을 줍니다. 눈이 크고 자신감 있는 표정을 짓고 있습니다.
*   **중간 고양이:** 밝은 분홍색으로, 둥글고 친근한 느낌을 줍니다. 장난기 넘치는 표정으로 앞으로 기대어 있습니다.
*   **오른쪽 고양이:** 밝은 노란색으로, 기하학적인 디자인을 하고 있습니다. 머리를 살짝 기울여 호기심 있는 표정을 짓고 있습니다.

전체적으로 디지털 그림이며, 선이 깔끔하고 색상이 강렬하게 표현되어 있습니다. 배경은 어두운 회색으로, 고양이들의 색깔을 더욱 돋보이게 합니다.

전반적으로 귀엽고 활기찬 느낌을 주는 그림입니다.

혹시 그림의 특정 부분에 대해 더 자세한 설명을 원하시면 말씀해주세요.

>>> Send a message (/? for help)


오른쪽 고양이의 썬글라스 색을 물어봤는데 제눈에는 노란색으로 보입니다. gemma3는 밝은 금색(Gold) 라고 합니다.

아마 저색이 금색이겠죠?

>>> 이 그림에서 오른쪽 고양이의 썬글라스 색깔을 알려주세요 vecteezy_three-cool-cats.jpg
오른쪽 고양이의 썬글라스 색깔은 **금색 (Gold)** 입니다.

사진을 자세히 살펴보니, 썬글라스 렌즈와 프레임이 모두 밝은 금색으로 되어 있습니다.

>>> Send a message (/? for help)

>>> Please tell me the color of the sunglasses on the cat on the right in this picture. vecteezy_three-cool-cats.jpg
The sunglasses on the cat on the right are **gold**. They have a bright, metallic gold color.

>>>


이번엔 표가 있는 이미지를 가지고 테스트 해보겠습니다.


>>> Describe the content of the given image ~/gemma3_prerequisites.jpeg
Added image '/Users/dongsik/workspace/ekyc/gemma3_prerequisites.jpeg'
The image is a table outlining the recommended GPU requirements for different model sizes (in billions of parameters) for a Text-to-Text model.
Here’s a breakdown of the information presented:

*   **Parameters (Billion):** The table lists the model size in billions of parameters (1B, 4B, 12B, 27B).
*   **VRAM Requirement (Text-to-Text):** This column specifies the amount of VRAM (Video RAM) needed to run the model for Text-to-Text tasks.
*   **VRAM Requirement (Image-to-Text):** This column specifies the amount of VRAM needed to run the model for Image-to-Text tasks.
*   **Recommended GPU:** This column lists the recommended GPU based on the VRAM requirement.

Essentially, it’s a chart showing the relationship between model size, VRAM requirements, and the corresponding GPU needed to run the model
effectively.

Do you want me to elaborate on any specific aspect of this table, such as the VRAM requirements for a particular model size or the GPU
recommended for a specific task?

>>>


>>> 주어진 이미지의 내용을 설명하세요. /Users/dongsik/workspace/ekyc/gemma3_prerequisites.jpeg
Added image '/Users/dongsik/workspace/ekyc/gemma3_prerequisites.jpeg'
다음은 이미지의 내용에 대한 설명입니다.

**표는 텍스트-투-텍스트 및 이미지-투-텍스트 작업에 필요한 GPU 사양을 나타냅니다.**

*   **Parameters (Billions):** 모델의 파라미터 수를 나타냅니다.
*   **VRAM Requirement (Text-to-Text):** 텍스트-투-텍스트 작업에 필요한 VRAM(비디오 RAM)의 양을 나타냅니다.
*   **VRAM Requirement (Image-to-Text):** 이미지-투-텍스트 작업에 필요한 VRAM의 양을 나타냅니다.
*   **Recommended GPU:** 주어진 파라미터 수에 맞는 VRAM 요구 사항을 충족하는 데 권장되는 GPU 모델을 나열합니다.

**주요 관찰 사항:**

*   파라미터 수가 증가함에 따라 텍스트-투-텍스트 및 이미지-투-텍스트 작업 모두에 필요한 VRAM 요구 사항이 크게 증가합니다.
*   더 큰 모델은 효율적으로 작동하기 위해 훨씬 더 많은 VRAM이 필요합니다.

이 표가 도움이 되었기를 바랍니다!

>>>


그럼 마지막으로 이미지에서 답을 찾아오는 질문을 해보겠습니다,

"그림에서 4B 모델을 image to text 하기위해 필요한 VRAM은 은 얼마인가요?"  네, 답은 10.4B 입니다.


결과를 보시죠.

>>> 그림에서 4B 모델을 image to text 하기위해 필요한 VRAM은 은 얼마인가요?
그림에 따르면 4B 모델을 image to text 하기 위해 필요한 VRAM은 10.4 GB입니다.

>>>


오....!!!

728x90
반응형
728x90
반응형

eKYC with Ollama & LLM Multi-modal Model OCR & DeepFace on Colab


목차

  • 개요
  • eKYC란?
  • 경량 LLM 멀티모달 모델
  • DeepFace
  • 로컬 터널링 서비스 Localtunnel
  • Demo 구현

개요

Google Colab에 Ollama 와 local LLM Vision 모델 및 DeepFace 라이브러리를 이용해서 eKYC 데모를 만들어 보겠습니다.

chatGPT와 같은 Public LLM 모델을 사용해도 되지만, 고객 신분증 및 사진과 같은 민감한 고객정보를 다루는 경우 Public LLM을 사용하기에는 제한(보안)이 따르기 때문에 local LLM으로 구현이 필요합니다.

eKYC란?

eKYC(Electronic Know Your Customer, 전자 고객 확인)는 고객의 신원을 디지털 방식으로 확인하는 자동화된 프로세스를 의미합니다. 전통적인 KYC(Know Your Customer) 프로세스가 물리적 문서(예: 신분증, 주소 증명)를 요구하고 대면 확인을 포함할 수 있는 반면, eKYC는 온라인 채널과 디지털 기술을 활용해 원격으로 신원 확인을 수행합니다. 이는 금융 기관, 통신사, 전자상거래 플랫폼 등 다양한 산업에서 사용되며, 자금 세탁 방지(AML) 및 테러 자금 조달 방지(CTF) 규정을 준수하는 데 필수적입니다.


주요 특징

1.디지털 신원 확인:

  • 고객이 웹 포털이나 모바일 앱을 통해 신분증 사진, 셀카(얼굴 인식용) 등을 제출합니다.
  • OCR(광학 문자 인식) 기술로 문서 데이터를 추출하고, 생체 인식(예: 얼굴 인식)으로 본인 여부를 확인합니다.
  • 정부 데이터베이스, 신뢰할 수 있는 제3자 데이터 소스(예: Aadhaar in India)와 연동해 정보를 검증합니다.

2. 전통적 KYC와의 차이점:

  • 속도: eKYC는 몇 분 내로 신원 확인을 완료할 수 있으며, 전통적 KYC는 며칠에서 몇 주가 걸릴 수 있습니다.
  • 편의성: 물리적 방문이나 문서 우송 없이 온라인으로 완료.
  • 효율성: 자동화로 인적 오류 감소 및 비용 절감.
  • 보안: 생체 인식, 일회용 비밀번호(OTP), 블록체인 기술로 보안 강화.

3. 주요 기술:

  • 생체 인식: 얼굴, 지문, 음성 인식.
  • AI 및 머신러닝: 문서 위조 탐지, 위험 프로파일링.
  • 블록체인: 데이터 보안 및 개인 정보 관리.
  • 데이터베이스 연동: 공공 레지스트리, 제재 리스트, PEP(정치적 주요 인물) 목록 확인.

eKYC의 이점

  • 고객 경험 개선: 빠르고 간편한 온보딩으로 고객 이탈률 감소.
  • 비용 절감: 수동 처리 및 물리적 문서 관리 비용 감소.
  • 규제 준수: AML, CTF, 데이터 보호법(GDPR, eIDAS 등) 준수.
  • 사기 방지: 디지털 흔적(IP 주소, 타이핑 속도 등)과 생체 인식을 활용해 신원 도용 및 사기 위험 감소.
  • 확장성: 대규모 고객 온보딩에 적합.

eKYC의 예시

  • 인도: Aadhaar 기반 eKYC로 은행 계좌 개설 및 SIM 카드 등록이 몇 분 내 완료. 인도 성인의 99.9%가 디지털 ID를 보유.
  • 은행: 고객이 모바일 앱으로 신분증과 셀카를 업로드해 계좌 개설.
  • 통신사: SIM 카드 활성화 시 eKYC로 신원 확인.
  • 헬스케어: 환자 신원 확인 및 의료 기록 정확성 보장.

한계 및 과제

  • 데이터 보안: 민감한 개인 정보(생체 데이터, 신분증 정보) 유출 위험.
  • 오류 가능성: 생체 인식의 오탐지(false positive/negative) 가능성.
  • 규제 차이: 국가별 eKYC 규정 상이(예: 미국은 연방 차원의 eID 미보급).
  • 기술 접근성: 디지털 기기나 인터넷 접근이 제한된 사용자의 배제 가능.

eKYC의 사용

금융기관 및 핀테크 기업이 eKYC를 활용해 계좌 개설, 대출 신청, 보험 가입 등을 간소화합니다. 예를 들어, 모바일 뱅킹 앱에서 주민등록증/운전면허증 스캔 및 얼굴 인식으로 신원 확인을 완료합니다. 인터넷 보급률 증가와 생체 인식 기술 발전으로 eKYC 채택이 증가하고 있습니다.

eKYC는 전통적 KYC를 디지털화해 속도, 편의성, 보안을 향상시킨 현대적 신원 확인 방식입니다. 금융, 통신, 헬스케어 등 다양한 산업에서 필수적이며, 특히 규제 준수와 사기 방지에 기여합니다. 다만, 데이터 보안과 기술 접근성을 고려한 지속적인 개선이 필요합니다.

경량 LLM 멀티모달 모델

최근 공개된 Gemma 3와 Granite 3.2 Vision 모델을 사용할 것입니다. 그래서 간단하게 주요 특징과 용도를 정리했습니다.

Gemma 3

  • 개요: Google이 개발한 경량 오픈소스 멀티모달 모델로, Gemini 기술을 기반으로 합니다. 비전 변형(4B, 12B, 27B 파라미터)은 텍스트와 이미지를 처리하며, 이미지 설명, 질문 응답, 시각 이해 등의 작업을 지원합니다.
  • 주요 특징:
    • 멀티모달: 텍스트와 이미지를 처리하며, 128K 토큰 컨텍스트 창과 140개 이상의 언어를 지원.
    • 효율성: 모바일 기기나 워크스테이션 같은 소비자 하드웨어에서도 실행 가능.
    • 성능: 27B 모델은 Gemini-1.5-Pro와 경쟁하며, 요약, 추론, 코드 생성에서 강력한 성능.
    • 구현: Hugging Face의 Gemma3ForConditionalGeneration AutoProcessor를 사용해 이미지 기반 작업(예: 이미지 설명, 텍스트 추출) 수행.
  • 용도: 챗봇, 코딩 도우미, 연구 도구, 이미지 캡셔닝, 시각 Q&A 등 멀티모달 애플리케이션.
  • 접근성: Hugging Face, Ollama, Google AI Studio에서 제공되며, 오픈 모델 가중치로 커스터마이징 가능.

Granite 3.2 Vision

  • 개요: IBM이 개발한 2B 파라미터의 오픈소스 비전-언어 모델로, Apache 2.0 라이선스 하에 기업용으로 설계되었으며, 특히 시각적 문서 이해에 특화.
  • 주요 특징:
    • 문서 이해: 표, 차트, 인포그래픽, 텍스트 중심 레이아웃 등에서 콘텐츠 추출에 최적화, 강력한 OCR(광학 문자 인식) 기능 포함.
    • 효율성: 소규모 모델로 빠른 성능과 낮은 비용 제공, 기업 애플리케이션에 적합.
    • 훈련: 다양한 시각 데이터(폰트, 레이아웃, 차트)로 훈련되어 복잡한 문서 형식 처리 가능.
  • 용도: 문서 처리 자동화, 재무 보고서, 송장, 프레젠테이션 데이터 추출, 기업용 AI 비서 구축.
  • 접근성: Hugging Face, IBM watson.ai 등에서 제공되며, 오픈소스로 파인튜닝 가능.

비교

  • 범위: Gemma 3 Vision은 텍스트와 이미지 작업을 위한 범용 멀티모달 모델이고, Granite 3.2 Vision은 문서 이해에 특화된 기업용 모델.
  • 규모: Gemma 3는 최대 27B로 다양한 작업에 적합, Granite 3.2는 2B로 작고 효율적.
  • 용도: Gemma 3는 다목적 AI 도구 개발에, Granite 3.2는 문서 분석이 필요한 비즈니스에 적합.

DeepFace

DeepFace는 얼굴 인식 및 분석을 위한 오픈소스 Python 라이브러리로, 딥러닝 기반의 다양한 얼굴 관련 작업을 지원합니다. 주로 신원 확인, 감정 분석, 속성 추출 등을 위해 사용되며, eKYC(전자 고객 확인)와 같은 애플리케이션에서 활용됩니다.

주요 특징

  • 얼굴 인식: 두 얼굴 이미지가 동일인인지 확인(1:1 매칭)하거나, 데이터베이스에서 얼굴을 식별(1:N 매칭).
  • 분석 기능:
    • 감정 분석(예: 행복, 슬픔, 분노).
    • 나이, 성별, 인종 추정.
    • 얼굴 속성(예: 안경 착용 여부).
  • 안티-스푸핑: 사진이나 영상으로 위조된 얼굴(스푸핑)을 탐지.
  • 백엔드 지원: VGG-Face, FaceNet, ArcFace 등 여러 딥러닝 모델 지원.
  • 효율성: 사전 훈련된 모델을 사용해 빠르게 구현 가능.
  • 호환성: OpenCV, TensorFlow, PyTorch와 통합 가능.

주요 기능

  • DeepFace.verify(): 두 이미지 간 얼굴 일치 여부 확인.
  • DeepFace.analyze(): 감정, 나이, 성별 등 얼굴 속성 분석.
  • DeepFace.stream(): 실시간 웹캠 스트리밍으로 얼굴 인식 및 분석.
  • DeepFace.find(): 데이터베이스에서 얼굴 매칭.

용도

  • eKYC: 금융 및 통신사의 신원 확인(예: 계좌 개설, SIM 등록).
  • 보안: 출입 통제, 감시 시스템.
  • 마케팅: 고객 감정 분석, 타겟팅.
  • 헬스케어: 환자 신원 확인.

한계

  • 정확도: 조명, 각도, 이미지 품질에 따라 결과가 달라질 수 있음.
  • 프라이버시: 생체 데이터 처리로 인해 데이터 보호 규제(GDPR 등) 준수 필요.
  • 리소스: 일부 모델은 GPU가 없으면 느릴 수 있음.

DeepFace는 얼굴 인식과 분석을 간편하게 구현할 수 있는 강력한 도구로, eKYC, 보안, 마케팅 등 다양한 분야에서 활용됩니다. 오픈소스라 커스터마이징이 가능하며, 사전 훈련된 모델로 빠른 시작이 가능합니다.


로컬 터널링 서비스 Localtunnel

로컬 터널링 서비스인 Localtunnel은 내부에서 실행 중인 서비스를 외부로 노출하는 데 사용됩니다. 외부 네트워크에서 로컬 PC에 접속하는 데 유용합니다. 

Localtunnel의 용도 

  • 로컬 서버를 외부에서 접속할 수 있도록 해줍니다
  • 외부 네트워크에서 로컬 PC에 접속할 수 있도록 해줍니다

Localtunnel의 사용법 

  • npm이 설치되어 있다면, npm install -g localtunnel을 실행합니다
  • p는 포트를 지정하고, s는 서브도메인을 지정합니다

Localtunnel과 유사한 도구로는 ngrok이 있습니다

  • ngrok은 공유기 포트 포워딩 설정보다 간단하게 외부 인터넷망에서 로컬 PC로 접속할 수 있도록 해줍니다 
     
  • ngrok은 애플리케이션을 실행하는 동안 HTTP 요청 로그를 확인할 수 있습니다 


Demo 구현


Colab의 런타임유형을 하드웨어 가속기 T4 GPU로 변경합니다.

런타임유형 - CPU

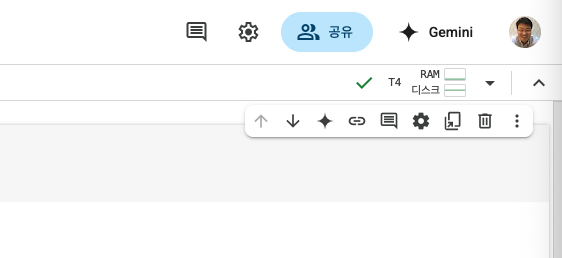
오른쪽 상단의 콤보박스를 클릭해서 "런타임 유형 변경" 매뉴로 들어갑니다.


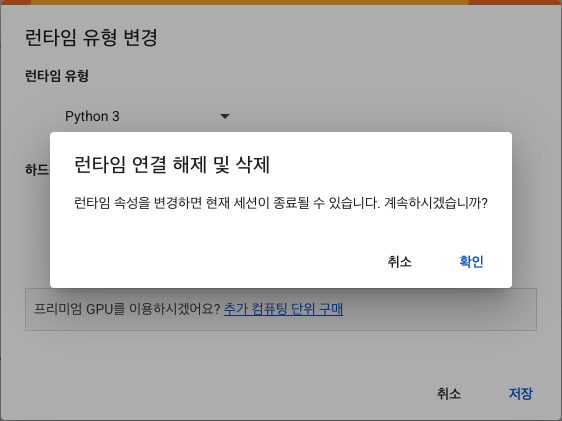
"런타임 유형 변경" 매뉴를 클릭하면, 아래 그림과 같이 "하드웨어 가속기"를 선택할수있습니다. 여기서 기본 설정인 CPU 대신 T4 GPU를 선택합니다.


T4 GPU를 선택하면 기존 CPU 런타임 연결을 해제 및 삭제하고 T4 GPU 런타임 속성으로 세로운 세션을 시작합니다.


"확인" 버튼을 누르면 T4로 세로운 세션의 런타임이 구동됩니다.

그럼, 순차적으로 새로운 런타임에 맞는 필요한 설정들을 시작합니다. 첫번째로 현재 작업디렉토리와 T3 GPU가 런타임의 GPU 옵션을 확인합니다.

# 현재 경로 확인
!pwd
!nvidia-smi


Colab에서 마운트된 디렉토리는 런타임이 연결해제되면 모든 파일들이 삭제됩니다. 반복된 작업을 위해서 별도의 Google Drive 디렉토리를 마운트해서 사용하면 런타임을 효율적으로 해제하고 다시연결해도 작업중인 파일들을 잃어버리지 않을수 있습니다.

# colab drive 마운트
from google.colab import drive
drive.mount('/content/drive')


다음과 같은 팝업으로 Google Drive엑세스 여부를 묻는다면 "Google Drive 연결"을 클릭하고 자신의 Google 계정을 선택해서 본인의 Google Drive로 연결합니다.


추가적인 3단계의 Google 계성선택 및 접속옵션을 선택하고 나면 "/content/drive"가 마운트됩니다.


미리 자신의 Google Drive에 만들어놓은 프로젝트 Directory로 Base 디렉토리 변경를 변경합니다.

## 작업 디렉토리로 이동 (chdir)
import os
os.chdir("/content/drive/MyDrive/ekyc_with_llm/")


현재 디렉토리를 확인해보고 디렉토리에 포함된 소스파일들을 확인합니다.

# chdir된 경로 및 파일확인
!pwd
!ls -al


저의 경우 로컬에서 개발하던 소스와 파일들을 Google Drive에 업로드 했습니다.


필요한 라이브러리를 설치합니다. 

# 필요한 라이브러리 및 Ollama 설치
!curl -fsSL https://ollama.com/install.sh | sh
!pip install ollama
!pip install deepface
!pip install -q streamlit
!pip install -q streamlit_option_menu


설치가완료되면 잘설치되었는지 pip 목록을 확인합니다.

!pip list | grep "ollama\|deepface\|streamlit"


필요한 라이브러리가 잘 설치되면 첫번재로 Ollama 서버를 백그라운드로 시작합니다.

# nohup을 사용하여 백그라운드에서 Ollama를 시작
!nohup ollama serve > ollama.log &


경량 멀티모달 모델 gemma3 4b와 granite3.2-vision 2b 모델을 받습니다.

!ollama list
!ollama pull gemma3:4b
!ollama pull granite3.2-vision
!ollama list


localtunnel을 설치합니다.

!npm install -g localtunnel


streamlit 을 백그라운드로 실행합니다.

!streamlit run app.py &>logs.txt &
Collecting usage statistics. To deactivate, set browser.gatherUsageStats to false.


  You can now view your Streamlit app in your browser.

  Local URL: http://localhost:8501
  Network URL: http://172.28.0.12:8501
  External URL: http://34.125.235.113:8501
  
  2025-04-22 03:20:36.026521: E external/local_xla/xla/stream_executor/cuda/cuda_fft.cc:477] Unable to register cuFFT factory: Attempting to register factory for plugin cuFFT when one has already been registered
WARNING: All log messages before absl::InitializeLog() is called are written to STDERR
E0000 00:00:1745292036.049572    4667 cuda_dnn.cc:8310] Unable to register cuDNN factory: Attempting to register factory for plugin cuDNN when one has already been registered
E0000 00:00:1745292036.057146    4667 cuda_blas.cc:1418] Unable to register cuBLAS factory: Attempting to register factory for plugin cuBLAS when one has already been registered
2025-04-22 03:20:36.081008: I tensorflow/core/platform/cpu_feature_guard.cc:210] This TensorFlow binary is optimized to use available CPU instructions in performance-critical operations.
To enable the following instructions: AVX2 AVX512F FMA, in other operations, rebuild TensorFlow with the appropriate compiler flags.


Streamlit 구동 포트를 localtunnel로 외부서비스 연결합니다. 

!npx localtunnel --port 8501 & curl ipv4.icanhazip.com


아래 your url을 클릭하거나 복사해서 브라우져를 띄웁니다.


앞서 localtunnel을 띄울때 curl 명령으로 구동되는 서버의 외부 공용 IP를 가져왔는데 그 아이피를  Tunnel Password로 입력합니다.

아이피를 복사해서 입력후 "Click to Submit" 합니다.


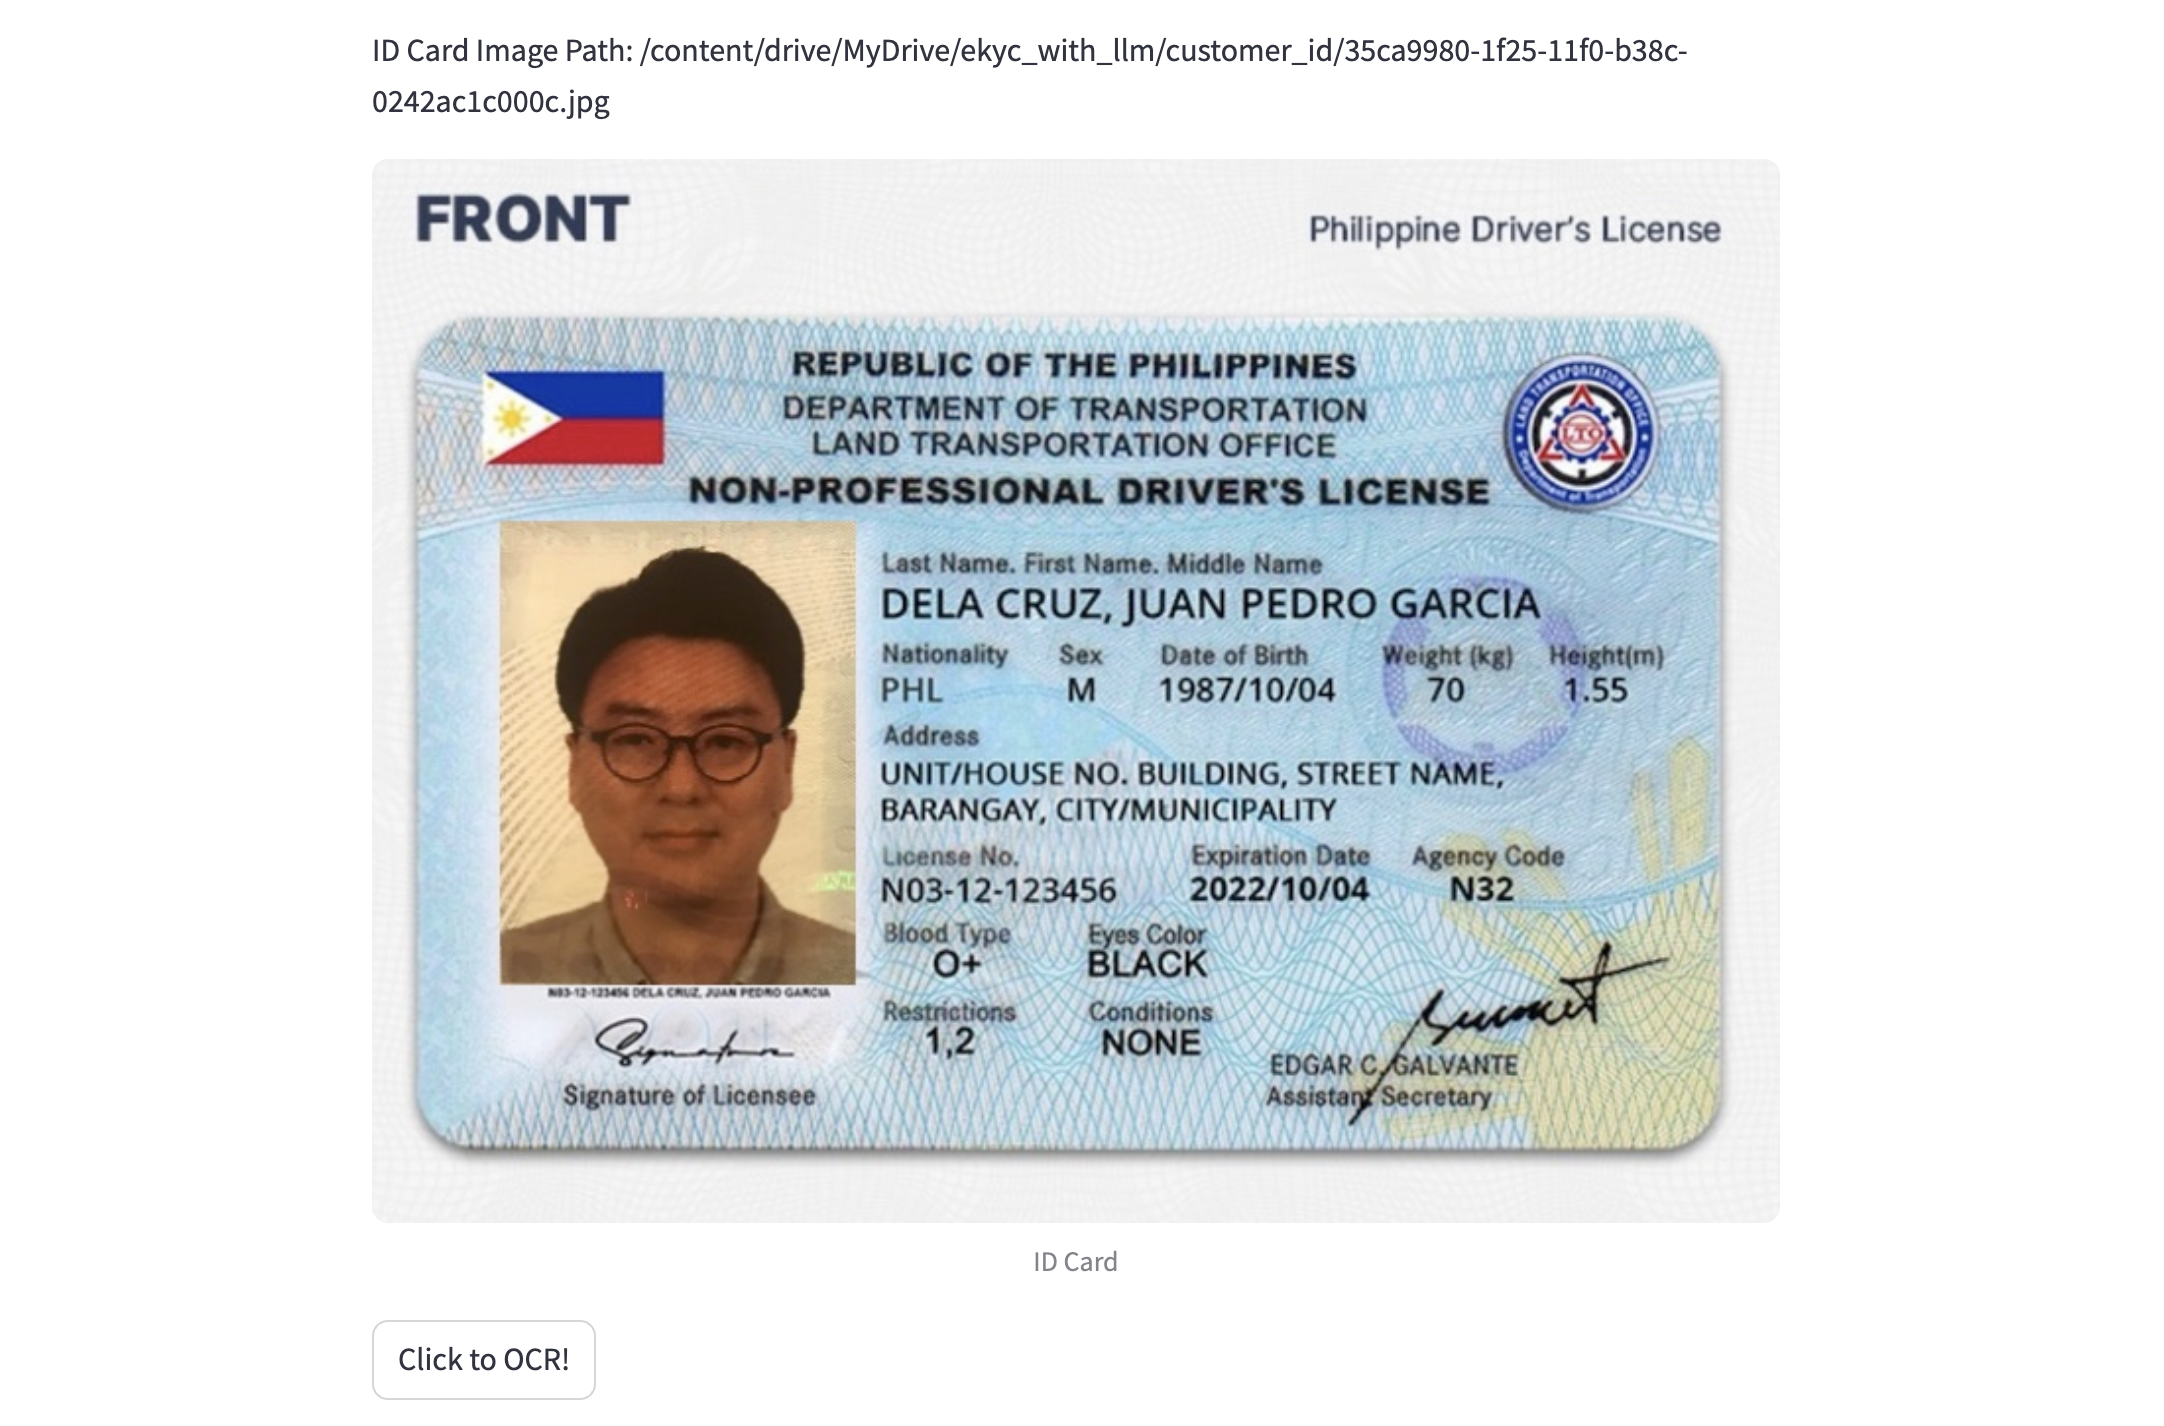
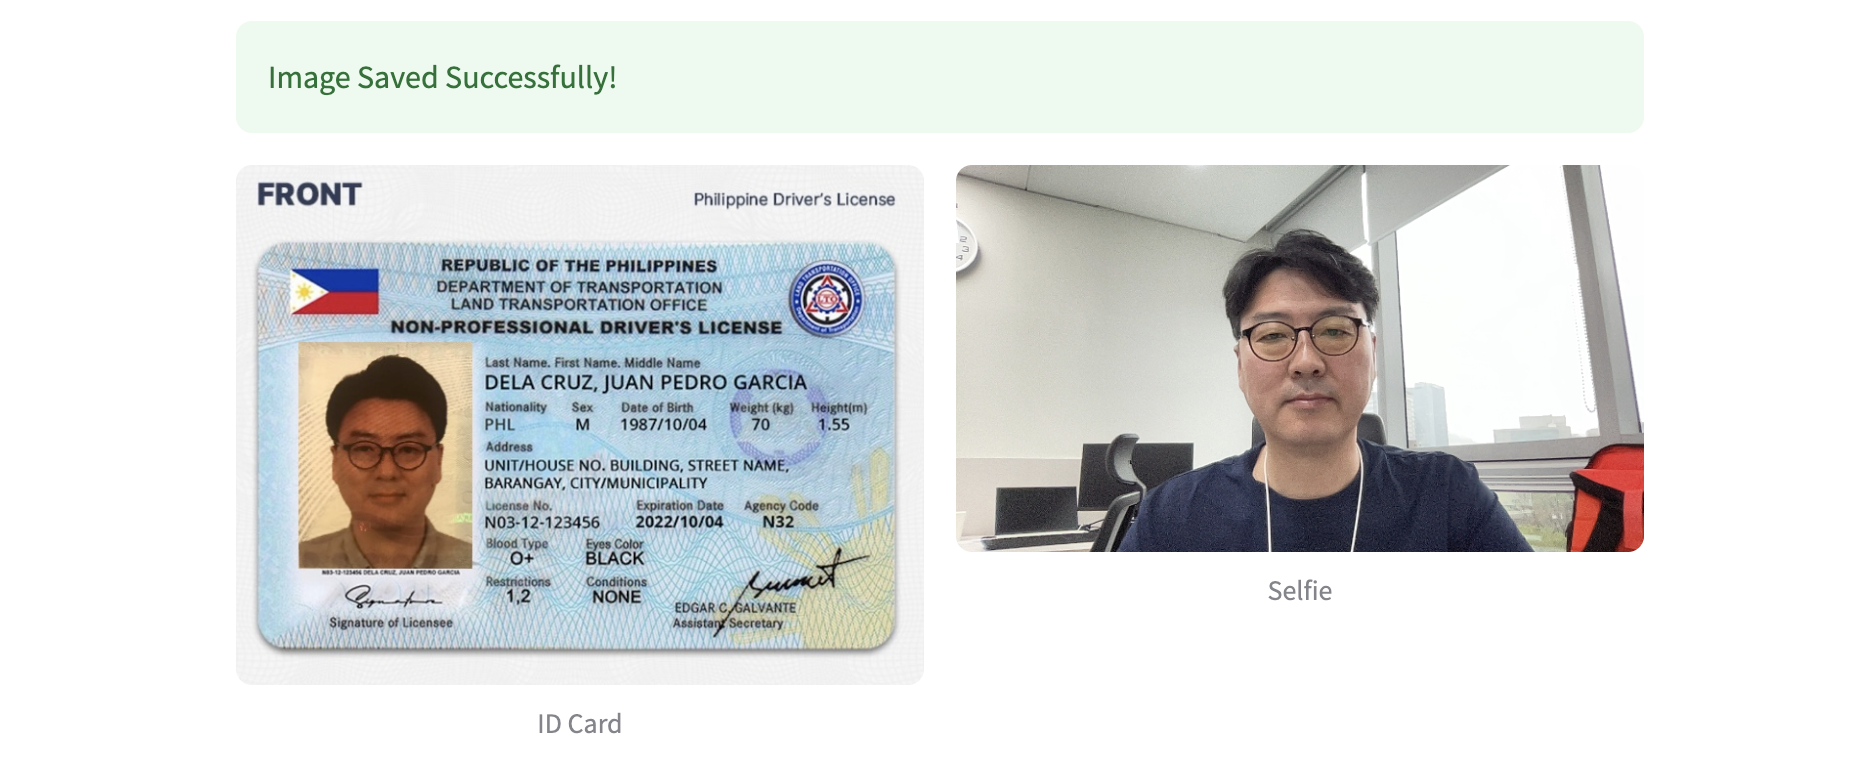
첫페이지인 ID Card를 등록페이지 입니다. 로컬파일등록 또는 사진으로 신분증을찍어서 업로드 할수있습니다.


Browse files로 파일을 선택합니다.


업로드한 신분증은 인터넷의 필리핀 일반 운전면허증(Driver's License) 에 제 사진을 복사해서 샘플로 만들었습니다. 

악의적으로 신분증 위변조를 검사할수있는 방법도 구현해야할 항목중하나 입니다.

혹시 방법을 아신다면 댓글로 말씀해주시면 도움이 됩니다. 

"Click to OCR!" 버튼을 누르면 신분증으로 OCR을 수행합니다.


Google Colab T4 기준 10초 걸렸습니다. 개인 M1 으로 테스트했을때 첫번째 수행시 60 ~ 70초 정도 소요되었었는데 (두번째 부터는 2~30초) 확실히 T4가 빠릅니다. 


운전면허증에 포함된 정보를 정확하게 추출해옵니다.

{
    "license": "Non-Professional Driver's License",
    "name": "DELA CRUZ, JUAN PEDRO GARCIA",
    "nationality": "PHL",
    "sex": "M",
    "dateOfBirth": "1987/10/04",
    "weight": "70",
    "height": "1.55",
    "address": "UNIT/HOUSE NO. BUILDING, STREET NAME, BARANGAY, CITY/MUNICIPALITY",
    "licenseNumber": "N03-12-123456",
    "expirationDate": "2022/10/04",
    "agencyCode": "N32",
    "bloodType": "O+",
    "eyesColor": "BLACK",
    "Restrictions": "NONE",
    "conditions": "1.2"
}


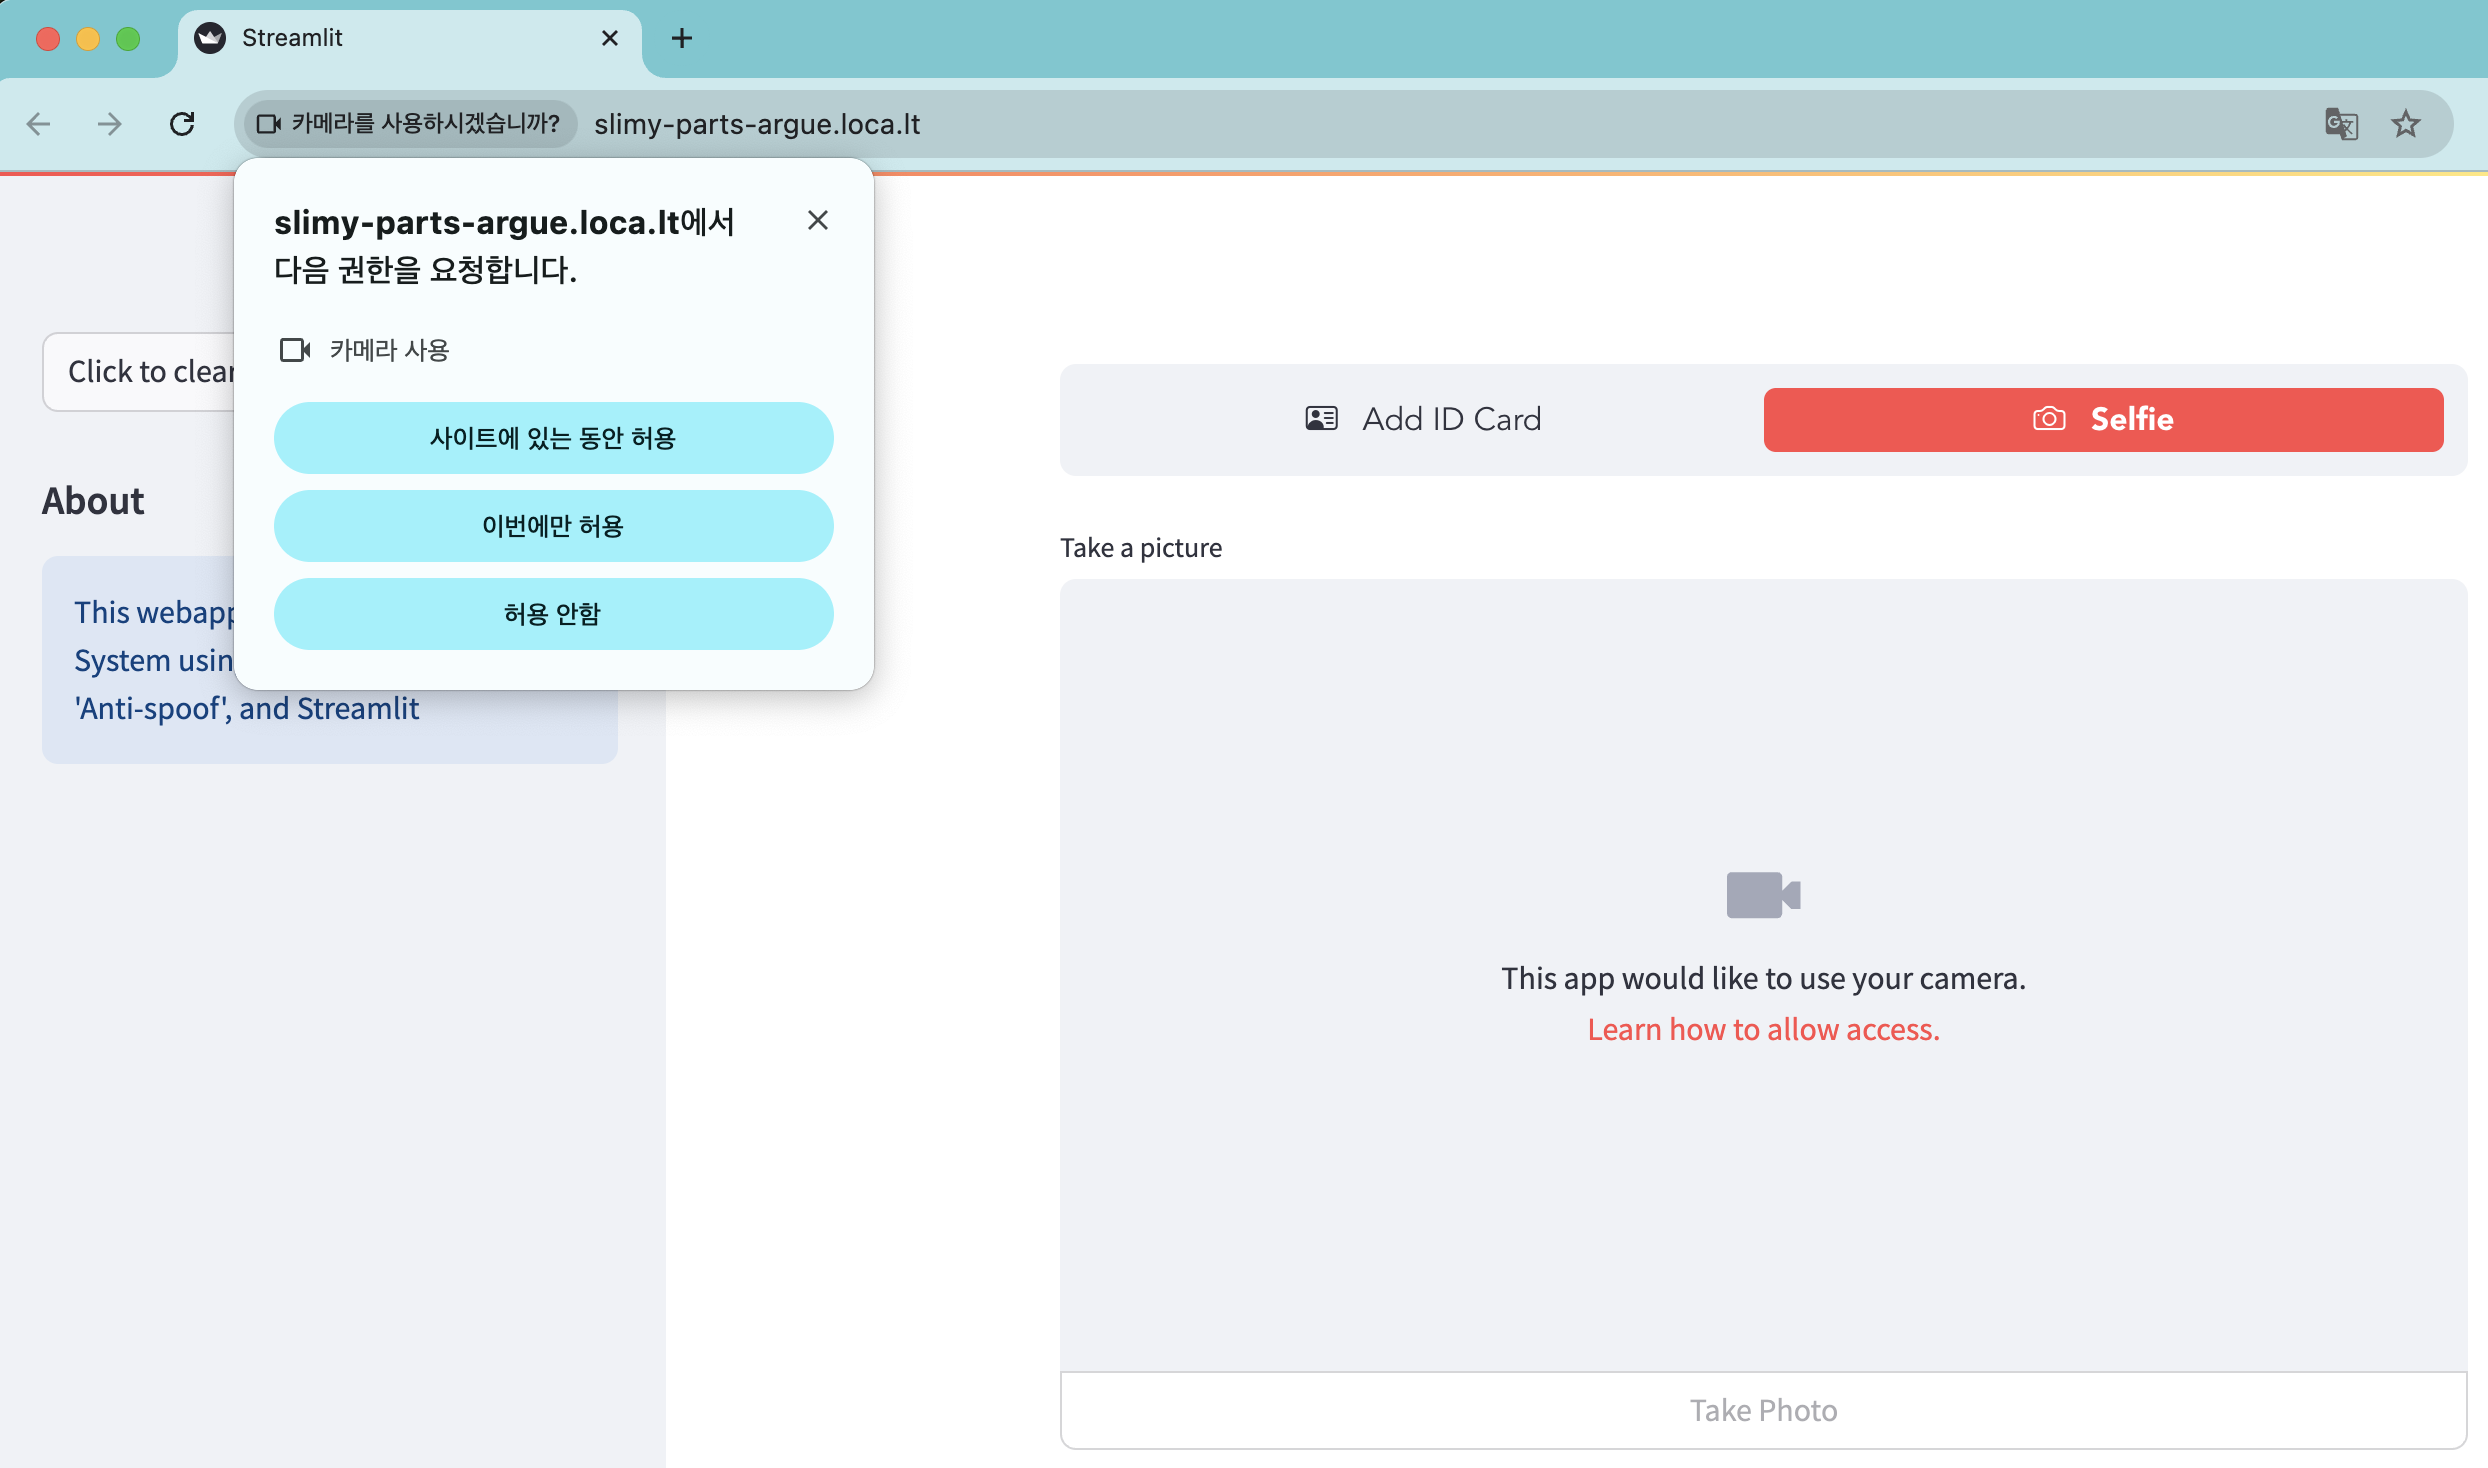
두번째로 Self 인증을 위해 본인사진을 찍도록합니다.


"Take Photo" 클릭하면 본인얼굴로 사진찍어 업로드되고 앞서 업로드한 신분증의 사진과 Selfie 사진을 비교하여 동일인지를 판단합니다. 

Verfification 결과 distance가 threshold값보다 작으면 유사도가 높은것으로 간주해서 "True"를 리턴합니다.

{
    "verified": true,
    "distance": 0.47204673328605784,
    "threshold": 0.68,
    "model": "VGG-Face",
    "detector_backend": "retinaface",
    "similarity_metric": "cosine",
    "facial_areas": {
        "img1": {
            "x": 0,
            "y": 0,
            "w": 104,
            "h": 130,
            "left_eye": null,
            "right_eye": null
        },
        "img2": {
            "x": 0,
            "y": 0,
            "w": 132,
            "h": 178,
            "left_eye": null,
            "right_eye": null
        }
    },
    "time": 1.98
}


이어서 추가할 기능

  • 위조신분증여부 판단
  • Face Anti-Spoofing
  • UI에서 신분증 위치 인식 및 사각형표시 (별도 opencv 기능으로)
  • Selfie에서 안면인식 및 타원표시 (별도 opencv 기능으로)


참고

Face Anti-Spoofing 안면 인식은 얼굴을 통해 사람을 식별하거나 특정인의 신원을 인증하는 방법

st.camera_input 사용자의 웹캠에서 사진을 반환하는 위젯을 표시


728x90
반응형
728x90
반응형


"Ollama with granite3.2-vision is excellent for OCR and for processing text afterwards"

"Granite3.2-vision이 포함된 Ollama는 OCR 및 이후 텍스트 처리에 매우 적합합니다."


최근 Reddit에 올라온 Ollama granite3.2-vision 모델에 대한 글을 보고 granite 모델로 신분증에 대해서 OCR을 하면 얼마나 성능이나 정확성이 나올지 궁금해서 테스트를 해봤습니다.


결과를 말씀드리면 속도, 성능, 정확성이 매우 뛰어납니다. 몇가지 신분증을 샘플로 해보도록 하겠습니다.


granite3.2-vision
A compact and efficient vision-language model, specifically designed for visual document understanding, 

enabling automated content extraction from tables, charts, infographics, plots, diagrams, and more.


A compact and efficient vision-language model, specifically designed for visual document understanding, enabling automated content extraction from tables, charts, infographics, plots, diagrams, and more. The model was trained on a meticulously curated instruction-following dataset, comprising diverse public datasets and synthetic datasets tailored to support a wide range of document understanding and general image tasks. It was trained by fine-tuning a Granite large language model with both image and text modalities.


컴팩트하고 효율적인 vision-language 모델로, 특히 시각적 문서 이해를 위해 설계되었습니다. 이 모델은 표, 차트, 인포그래픽, 그래프, 다이어그램 등에서 자동으로 콘텐츠를 추출할 수 있도록 최적화되었습니다. 다양한 공개 데이터셋과 문서 이해 및 일반 이미지 작업을 지원하는 합성 데이터셋으로 구성된 세밀하게 선별된 instruction-following 데이터셋을 활용해 학습되었습니다. 이미지와 텍스트 모달리티를 모두 포함하여 Granite 대형 언어 모델을 미세 조정(fine-tuning)하는 방식으로 훈련되었습니다.


참고

Hugging Face


모델사이즈는 2B로 다운로드 받으면 2.4GB로 llama3.2-vision의 7.9GB에 비해서도 작은 사이즈입니다.

% ollama list
NAME                        ID              SIZE      MODIFIED
granite3.2-vision:latest    3be41a661804    2.4 GB    About a minute ago
llama3.2-vision:latest      085a1fdae525    7.9 GB    5 days ago


Jupyter 노트북으로 샘플을 만들어보겠습니다.


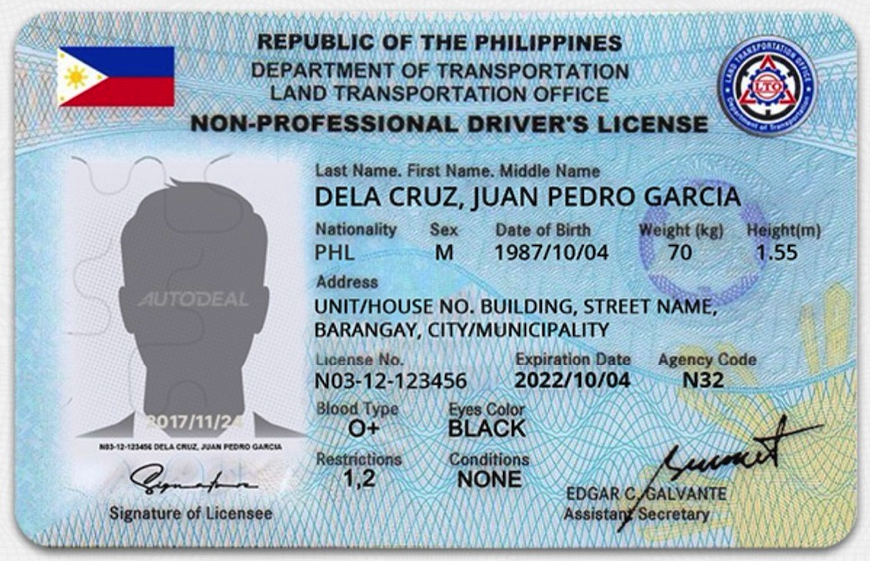
사용한 샘플 사진은 구글에서 검색한 필리핀 Driver license 샘플이미지입니다.

테스트 이미지


import ollama
import time
from IPython.display import Image, Markdown, display

def Talk_with_granite_3_2_vision(user_query, input_image):
    start_time = time.time()  # Start timer
    response = ollama.chat(
    model='granite3.2-vision:latest',
    messages=[{
        'role': 'user',
        'content': user_query,
        'images': [input_image]
        }]
    )
    end_time = time.time()  # End timer
    # Calculate elapsed time
    execution_time = end_time - start_time
    #print(f"Response: {response['message']['content']}")
    print(f"Response: {response}")
    print(f"Execution time: {execution_time:.2f} seconds")
    
    return response


display(Image(filename="driver_license.jpeg"))

image display


Talk_with_granite_3_2_vision('Describe the content of the given image','driver_license.jpeg')


문서 안에 Text를 비롯해서 문의의 설명까지 상세하게 가져온걸 확인할수있습니다.


Response: model='granite3.2-vision:latest' created_at='2025-03-15T01:30:57.858356Z' done=True done_reason='stop' total_duration=80162497333 load_duration=46421333 prompt_eval_count=5157 prompt_eval_duration=972000000 eval_count=808 eval_duration=79134000000 message=Message(role='assistant', content='\nThe image depicts a Philippine driver\'s license issued by the Department of Transportation Land Transportation Office (DOTLTO). This document is specifically labeled as a "Non-Professional Driver’s License." The front cover of the license features several key elements:\n\n1. **Country and Issuing Authority**: At the top, there is a flag of the Philippines, indicating that this is an official government document from the Philippines. Below the flag, it reads "REPUBLIC OF THE PHILIPPINES" followed by "DEPARTMENT OF TRANSPORTATION LAND TRANSPORTATION OFFICE."\n\n2. **License Type**: The title of the document is prominently displayed as "NON-PROFESSIONAL DRIVER’S LICENSE," which specifies that this license is intended for individuals who are not professionally licensed to drive but rather hold a provisional or temporary driver\'s license.\n\n3. **Personal Information**:\n   - **Last Name**: DELA CRUZ\n   - **First Name**: JUAN PEDRO GARCIA\n   - **Nationality**: PHIL\n   - **Sex**: M (Male)\n   - **Date of Birth**: 1987/10/04\n   - **Height (in meters)**: 1.55\n   - **Weight (in kilograms)**: 70\n\n4. **Identification Number**: The license number is "N03-12-123456."\n\n5. **Address**: The address listed on the license is "AUTODEAL UNIT/HOUSE NO. BUILDING, STREET NAME: BARANGAY, CITY/MUNICIPALITY," which indicates that the holder of this license resides in Barangay, City/Municipality.\n\n6. **License Expiration Date**: The expiration date is "2022/10/04."\n\n7. **Restrictions and Conditions**: There are two restrictions listed:\n   - Restrictions 1.2\n   - Conditions NONE\n\n8. **Signature of Licensee**: At the bottom, there is a signature of the licensee, which reads "EDGAR C. SALVANTE," followed by his designation as "Assistant Secretary."\n\n9. **Seal and Logo**: The top right corner features a seal with the text "DOTLTO" inside it, indicating that this document is an official government-issued license.\n\n### Analysis:\nThis non-professional driver\'s license serves as proof of identity for individuals who are not professionally licensed to drive but hold a provisional or temporary license. The details provided on the license include personal information such as name, date of birth, height, weight, and address, which are essential for identification purposes. The expiration date ensures that the license remains valid for a specified period, after which it must be renewed or replaced.\n\nThe restrictions listed (Restrictions 1.2) and conditions (NONE) indicate specific rules or regulations that the holder of this license must adhere to. These could include age limits, vehicle type restrictions, or other legal requirements pertinent to driving in the Philippines. The signature of the Assistant Secretary verifies the authenticity of the document and confirms that it was issued by a legitimate authority within the Department of Transportation Land Transportation Office.\n\n### Conclusion:\nThis non-professional driver\'s license is an essential document for individuals in the Philippines who are not professionally licensed to drive but hold a provisional or temporary license. It contains all necessary personal and identification details, as well as restrictions and conditions that must be followed by the holder. The signature of the Assistant Secretary adds an additional layer of authenticity to the document.', images=None, tool_calls=None)
Execution time: 80.19 seconds


asitop 실행모니터링


그럼 사용자 쿼리를 조정해서 OCR로 추출한 text들을 필요한 항목들만 가져도록 조정해보겠습니다.


신분증 이미지를 보면 아래 항목들이 포함되어 있습니다. 제가 필요한것은 각 항목에 맞는 데이터를 추출하는것입니다

- License Type

- Last Name, First Name, Middle Name
- Nationality
- Sex
- Date of Birth
- Weight (in kg)
- Height (in m)
- Address
- License Number
- Expiration Date
- Agency Code
- Blood Type
- Eyes Color
- Restrictions
- Conditions


먼저  user_query 를 다음과 같이 지정해서 실행해보게습니다. 'OCR the text of the image. What is license type?'

user_query = 'OCR the text of the image. What is license type?'

response = Talk_with_granite_3_2_vision(user_query,'driver_license.jpeg')


Response: model='granite3.2-vision:latest' created_at='2025-03-15T01:51:00.248422Z' done=True done_reason='stop' total_duration=72551407958 load_duration=1374949917 prompt_eval_count=5162 prompt_eval_duration=66223000000 eval_count=54 eval_duration=4948000000 message=Message(role='assistant', content='\nThe license type indicated on the driver\'s license in the image is a "NON-PROFESSIONAL DRIVER\'S LICENSE." This is clearly stated at the top of the document, just below the Philippine flag and above the personal details section.', images=None, tool_calls=None)
Execution time: 72.57 seconds


응답으로 "NON-PROFESSIONAL DRIVER\'S LICENSE." 라고 알려줍니다.  


출력결과를 아래 원본이미지와 비교해보면서 필요한 필요한 항목들을 OCR한 결과와 매핑해보면 다음과 같습니다.

"License": "NON-PROFESSIONAL DRIVER'S LICENSE",
"name": "DELA CRUZ, JUAN PEDRO GARCIA",
"sex": "M",
"dateOfBirth": "1987/10/04",
"weight": "70",
"height": "1.55",
"address": "AUTODEAL UNIT/HOUSE NO. BUILDING, STREET NAME, BARANGAY, CITY/MUNICIPALITY",
"nationality": "PHL",
"licenseNumber": "N03-12-123456",
"expirationDate": "2022/10/04",
"agencyCode": "N32",
"bloodType": "O+",
"eyesColor": "BLACK",
"Restrictions": "1,2",
"conditions": "NONE"


와우 역시 좋네요.!!


728x90
반응형
728x90
반응형

https://www.ibm.com/kr-ko/new/announcements/ibm-granite-3-2-open-source-reasoning-and-vision


IBM Granite 3.2: 오픈 소스 추론 및 비전

추론 기능이 강화된 Granite 3.2 Instruct 모델과 멀티모달 Granite Vision 3.2를 중심으로 한 IBM Granite 3.2는 몇 가지 새로운 엔터프라이즈 기능을 도입했습니다.

www.ibm.com


Granite Vision 3.2 2B는 일상적인 기업 사용 사례를 대상으로 하는 컴퓨팅 비전 기능을 갖춘 경량형 대규모 언어 모델로, 특히 시각적 문서 이해에 중점을 두고 학습되었습니다. 이미지 및 텍스트 입력을 모두 처리하는 Granite Vision 3.2의 성능은 DocVQA, ChartQA와 같은 필수 엔터프라이즈 벤치마크에서 훨씬 더 큰 개방형 모델의 성능과 비슷합니다.

문서 이해 작업의 성능을 측정하는 벤치마크에서 Granite Vision 3.2는 훨씬 더 큰 개방형 모델과 어깨를 나란히 합니다.

Granite Vision 3.2 2B는 언어 작업에서 비슷한 크기의 텍스트 전용 Granite 모델을 즉시 대체하기 위한 것은 아니지만, 텍스트 입력, 텍스트 출력 시나리오를 유능하게 처리할 수 있습니다.

엔터프라이즈 이미지의 시각을 위한 비전

Granite Vision 3.2 2B는 다양한 시각적 이해 작업을 처리할 수 있지만, 문서 이해 및 멀티모달 검색 증강 생성(RAG)과 가장 관련성이 높은 작업에 특화되어 있습니다.

Granite 3.2 2B Vision Demo (1:20 min)

멀티모달 대규모 언어 모델(MLLM)이라고도 부르는 대부분의 VLM은 주로 자연 이미지에 대한 비전 작업을 위해 학습됩니다. 레이아웃, 글꼴, 차트, 인포그래픽 등 고유한 시각적 특성이 자연 이미지와 크게 다른 문서 이미지에서는 최적의 성능을 발휘하지 못합니다. 대부분의 일반화된 이미지인, 텍스트아웃 사용 사례와 비교하여, 문서 이해에는 시각적 맥락에 대한 보다 구체적이고 세분화된 이해를 필요로 합니다.

MLLM이 문서 및 관련 시각 자료를 효과적으로 처리할 수 있도록 하는 데 있어 두 가지 주요 과제는 고해상도 이미지를 적절하게 인코딩하고 해당 문서 내에서 시각적으로 배치된 텍스트를 정확하게 해석하는 것입니다. 전문화된 접근 방식은 일반적으로 외부 광학 문자 인식(OCR) 시스템에 의존하여 '인식 후 이해' 프레임워크에서 이미지 내의 텍스트를 처리하거나, 문서 이해만을 위해 설계된 맞춤형 모델 아키텍처를 사용합니다.

두 가지 접근 방식 모두 단점이 있습니다. 외부 OCR 기반 문서 이해에 의존하면 필수 정보가 언어에 도달하기 전에 오류가 누적될 수 있으며, 많은 전용 'OCR 프리' 방식은 고해상도 입력을 처리하는 데 어려움을 겪거나 경쟁 LLM에 비해 전반적인 지식 부족으로 어려움을 겪습니다.2

최근에는 문서 중심 데이터 세트에서 일반화된 비전 언어 모델을 명령 조정하여 문서 이해에서 강력한 성능을 달성했습니다. 안타깝게도, 이 접근 방식의 진전은 적절한 오픈 소스 데이터 세트의 부족으로 인해 다소 제한되었습니다. 이 접근 방식을 더욱 발전시키기 위해 IBM의 Granite Vision 3.2 개발에는 시각적 문서 이해를 위한 포괄적인 명령 준수 데이터 세트에 대한 광범위한 작업이 포함되었습니다.

DocFM: 엔터프라이즈 비전 작업을 위한 명령 조정 데이터 세트

DocFM 데이터 세트는 신중하게 선별된 엔터프라이즈 데이터를 기반으로 구축된 비전 작업을 위한 대규모 명령 조정 데이터 세트입니다. 문서 이해 데이터 세트 수집에 사용된 데이터 소스, 초기 수집을 처리하는 데 사용된 필터링 및 정리 방법, 이후 Granite Vision에 대한 학습 작업을 합성적으로 생성하는 데 사용되는 방법론에 대한 광범위한 세부 정보가 함께 제공되는 기술 백서에 나와 있습니다.

Granite Vision을 학습시키는 데 사용되는 문서 이해 데이터는 일반 문서 이미지, 차트, 순서도 및 다이어그램의 범주와 함께 다양한 문서 클래스를 다룹니다. 명령 준수 데이터 세트는 문서 질문 답변, 장면 텍스트 이해, 키-값 추출, 텍스트 그라운딩, 레이아웃 구문 분석, 캡션, UI 이해 및 코드를 포함한 다양한 작업에 걸쳐 있습니다.

왼쪽: 문서 이해 학습 데이터 소스, 오른쪽: 일반 이미지 데이터에 사용되는 데이터 세트

DocFM은 IBM이 향후 다양한 다운스트림 시각 학습 활동에 사용되는 매우 큰 데이터 세트입니다. Granite Vision의 학습은 DocFM의 하위 집합을 사용하여 일련의 합성 시각적 질문-답변 데이터 세트를 생성했습니다. 기술 문서 부록의 표 5에는 Granite Vision에 사용된 문서 이해 데이터 세트에 대한 포괄적인 개요가 나와 있습니다.

내재적 안전 모니터링을 위한 희소 어텐션 벡터

Granite 3.2 Vision의 설계 및 학습에서 IBM은 유해한 활동을 모니터링하기 위해 외부 가드레일 모델에 의존하는 대신 Granite 모델 자체에 직접 통합하는 새로운 테스트 시간 기술도 도입했습니다.

핵심 인사이트는 Granite Vision의 많은 어텐션 헤드와 트랜스포머 계층 내에 안전 모니터링 작업이 분류 문제로 공식화될 때 안전 문제를 식별하는 데 유용할 수 있는 이미지 기능의 희소한 하위 집합이 있다는 것입니다.

Granite Vision 기술 문서에 자세히 설명되어 있는 프로세스에서 IBM Research는 Granite Vision의 어텐션 메커니즘 내에서 생성된 어텐션 벡터를 분리하고 검사하여 평균적으로 특정 부류의 유해 입력과 안정적으로 상관관계가 있는 어텐션 벡터를 평가하는 프로세스를 설계했습니다. 일단 식별되면, 이러한 '안전 벡터'를 생성하는 어텐션 헤드를 사용하여 주어진 입력이 안전한지 여부를 판단할 수 있습니다.


https://github.com/ibm-granite/granite-vision-models


GitHub - ibm-granite/granite-vision-models

Contribute to ibm-granite/granite-vision-models development by creating an account on GitHub.

github.com


https://arxiv.org/html/2502.09927v1


Granite Vision: a lightweight, open-source multimodal model for enterprise Intelligence

Authors (alphabetical order): Granite Vision Technical Leadership: Assaf Arbelle, Leonid Karlinsky, Peter Staar, Rogerio Feris, Tal Drory Project Management: Abraham Daniels Core Contributors: Ahmed Nassar, Amit Alfassi, Bo Wu, Eli Schwartz, Dhiraj Joshi,

arxiv.org

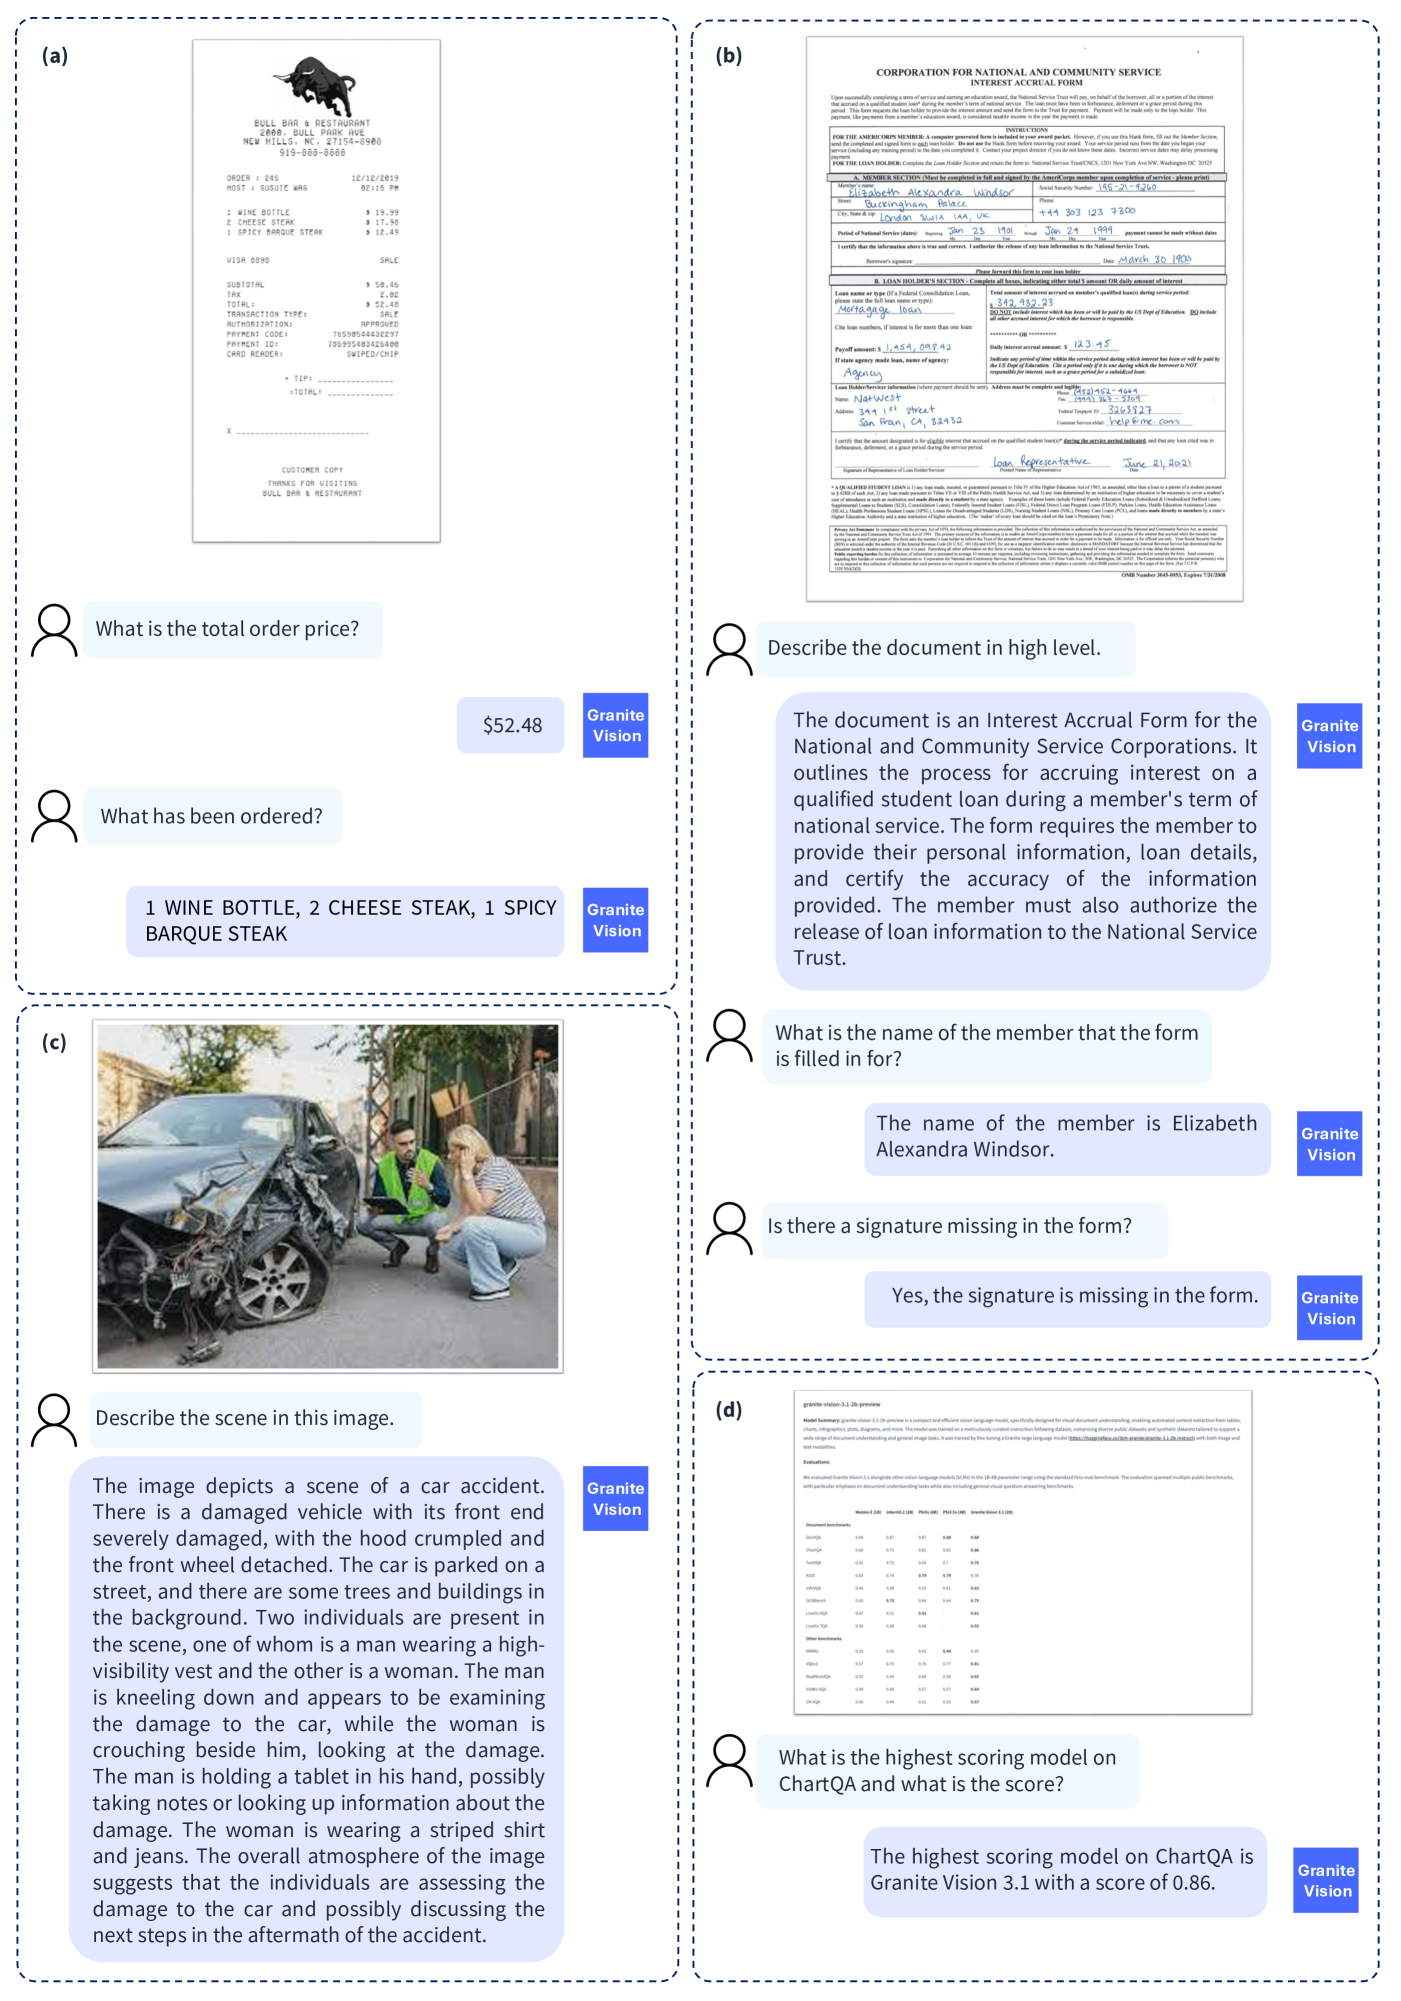
그림 1: Granite Vision이 생성한 정성적 사례


(a) 영수증 계산과 같은 문서 이해

(b) 사람이 직접 쓴 텍스트를 통한 양식 이해

(c) 지식 기반 이미지 설명

(d) 표 이해


등 다양한 기능이 포함됩니다.


참고 샘플

https://er-vishalanand.medium.com/ibms-granite-3-2-vision-model-a9f701bde847


IBM’s Granite 3.2 Vision Model

on NVIDIA with open-source UI for AI.

er-vishalanand.medium.com


기사

https://www.datanet.co.kr/news/articleView.html?idxno=200088


IBM, 기업 전용 LLM 모델 ‘그래니트 3.2’ 출시 - 데이터넷

[데이터넷] IBM은 거대언어모델(LLM) 제품군의 차세대 버전인 그래니트(Granite) 3.2를 출시했다고 27일 밝혔다.그래니트 3.2 모델은 허깅 페이스(Hugging Face)에서 허용되는 아파치 2.0 라이선스에 따라

www.datanet.co.kr


728x90
반응형
728x90
반응형

DeepFace


DeepFace는 파이썬을 위한 가벼운 얼굴 인식 및 얼굴 속성 분석( 나이 , 성별 , 감정  인종 ) 프레임워크입니다. 최첨단 모델을 래핑하는 하이브리드 얼굴 인식 프레임워크입니다 : 

VGG-Face, FaceNet, OpenFace, DeepFace, DeepID, ArcFace, Dlib, SFace, GhostFaceNet, Buffalo_L.

Experiments 인간의 얼굴 인식 작업 정확도는 97.53%인 반면, 해당 모델은 이미 이 정확도 수준에 도달하여 이를 넘어섰습니다 .

설치

deepface를 설치하는 가장 쉬운 방법은 PyPI에서 다운로드하는 것입니다 . 라이브러리 자체와 필수 구성 요소도 설치됩니다.

$ pip install deepface


또는 소스 코드에서 deepface를 설치할 수도 있습니다. 소스 코드에는 아직 pip 릴리스에 공개되지 않은 새로운 기능이 있을 수 있습니다.

$ git clone https://github.com/serengil/deepface.git
$ cd deepface
$ pip install -e .


라이브러리를 설치한 후에는 라이브러리를 가져와서 해당 기능을 사용할 수 있습니다.

from deepface import DeepFace


현대 얼굴 인식 파이프라인 - Demo

최신 얼굴 인식 파이프라인은 detect , align , normalize , representation , verify 라는 5가지 일반적인 단계로 구성됩니다. 

DeepFace는 이러한 모든 일반적인 단계를 백그라운드에서 처리하지만, 그 뒤에 있는 모든 프로세스에 대한 심층적인 지식을 습득할 필요는 없습니다. 한 줄의 코드로 verification, find 또는 analysis 함수를 호출하기만 하면 됩니다.


얼굴 확인 - Demo

이 함수는 얼굴 쌍을 같은 사람인지 다른 사람인지 확인합니다. 정확한 이미지 경로를 입력으로 기대합니다. numpy 또는 base64로 인코딩된 이미지를 전달하는 것도 환영합니다. 그런 다음 사전을 반환하고 검증된 키만 확인해야 합니다.

result = DeepFace.verify(img1_path = "img1.jpg", img2_path = "img2.jpg")

얼굴 인식 - Demo

얼굴 인식은 얼굴 검증을 여러 번 적용해야 합니다. 여기서 deepface는 이 작업을 처리하기 위한 기본 find 함수를 가지고 있습니다. 데이터베이스 경로에서 입력 이미지의 신원을 찾고 출력으로 pandas 데이터 프레임 목록을 반환합니다. 한편, 얼굴 데이터베이스의 얼굴 임베딩은 다음에 더 빠르게 검색할 수 있도록 pickle 파일에 저장됩니다. 결과는 소스 이미지에 나타나는 얼굴의 크기가 됩니다. 게다가, 데이터베이스의 대상 이미지에도 여러 얼굴이 있을 수 있습니다.

dfs = DeepFace.find(img_path = "img1.jpg", db_path = "C:/my_db")
 

임베딩 - Demo


얼굴 인식 모델은 기본적으로 얼굴 이미지를 다차원 벡터로 표현합니다. 때로는 이러한 임베딩 벡터가 직접 필요합니다. DeepFace에는 전용 표현 함수가 제공됩니다. Represent 함수는 임베딩 목록을 반환합니다. 결과는 이미지 경로에 나타나는 얼굴의 크기가 됩니다.

embedding_objs = DeepFace.represent(img_path = "img.jpg")


임베딩은 아래와 같이 플로팅 할 수 있습니다 . 각 슬롯은 차원 값에 해당하며 차원 값은 색상으로 강조됩니다. 2D 바코드와 유사하게 수직 차원은 일러스트레이션에 정보를 저장하지 않습니다.

얼굴 인식 모델 - Demo


DeepFace는 하이브리드 얼굴 인식 패키지입니다. 현재 최첨단(state-of-the-art) 얼굴 인식 모델인 : VGG-Face, FaceNet,  OpenFace, DeepFace, DeepID, ArcFace, Dlib, SFace,  GhostFaceNet, Buffalo_L을 많이 래핑합니다 . 기본 구성은 VGG-Face 모델을 사용합니다.

models = [
    "VGG-Face", "Facenet", "Facenet512", "OpenFace", "DeepFace",
    "DeepID", "ArcFace", "Dlib", "SFace", "GhostFaceNet",
    "Buffalo_L",
]

result = DeepFace.verify(
  img1_path = "img1.jpg", img2_path = "img2.jpg", model_name = models[0]
)

dfs = DeepFace.find(
  img_path = "img1.jpg", db_path = "C:/my_db", model_name = models[1]
)

embeddings = DeepFace.represent(
  img_path = "img.jpg", model_name = models[2]
)


FaceNet, VGG-Face, ArcFace 및 Dlib는 실험에 근거하여 성능이 뛰어난 모델입니다. BENCHMARKS자세한 내용은 를 참조하십시오. DeepFace의 다양한 모델에 대한 측정 점수와 원래 연구에서 보고된 점수는 다음 표에서 찾을 수 있습니다.

모델측정된 점수선언된 점수

Model Measured Score Declared Score
Facenet512 98.4% 99.6%
Human-beings 97.5% 97.5%
Facenet 97.4% 99.2%
Dlib 96.8% 99.3 %
VGG-Face 96.7% 98.9%
ArcFace 96.7% 99.5%
GhostFaceNet 93.3% 99.7%
SFace 93.0% 99.5%
OpenFace 78.7% 92.9%
DeepFace 69.0% 97.3%
DeepID 66.5% 97.4%


DeepFace 내에서 이러한 모델로 실험을 수행하면 고유한 탐지 또는 정규화 기술을 채택했기 때문에 원래 연구와 비교하여 차이가 드러날 수 있습니다. 게다가 일부 모델은 사전 훈련된 가중치가 없는 백본만 가지고 출시되었습니다. 따라서 우리는 원래 사전 훈련된 가중치 대신 재구현을 활용하고 있습니다.


유사성 - Demo


얼굴 인식 모델은 일반적인 합성 신경망 이며 얼굴을 벡터로 표현하는 역할을 합니다. 우리는 같은 사람의 얼굴 쌍이 다른 사람의 얼굴 쌍보다 더 유사 할 것으로 예상합니다.

유사도는 코사인 유사도 , 유클리드 거리 또는 L2 정규화된 유클리드 와 같은 다양한 지표로 계산할 수 있습니다 . 기본 구성은 코사인 유사도를 사용합니다. 실험 에 따르면 , 어떤 거리 지표도 다른 것보다 성능이 뛰어나지 않습니다.

metrics = ["cosine", "euclidean", "euclidean_l2"]

result = DeepFace.verify(
  img1_path = "img1.jpg", img2_path = "img2.jpg", distance_metric = metrics[1]
)

dfs = DeepFace.find(
  img_path = "img1.jpg", db_path = "C:/my_db", distance_metric = metrics[2]
)


얼굴 속성 분석 - Demo


DeepFace에는 또한 age, gender, facial expression(화남, 두려움, 중립, 슬픔, 혐오, 행복, 놀람 포함) 및 race(아시아인, 백인, 중동인, 인도인, 라틴계, 흑인 포함) 예측을 포함한 강력한 얼굴 속성 분석 모듈이 함께 제공됩니다. 결과는 소스 이미지에 나타나는 얼굴의 크기가 됩니다.

objs = DeepFace.analyze(
  img_path = "img4.jpg", actions = ['age', 'gender', 'race', 'emotion']
)

튜토리얼 에 언급된 대로 연령 모델은 ± 4.65 MAE를 얻었고, 성별 모델은 97.44%의 정확도, 96.29%의 정밀도, 95.05%의 재현율을 얻었습니다 .


얼굴 감지 및 정렬 - Demo


얼굴 감지 및 정렬은 현대 얼굴 인식 파이프라인의 중요한 초기 단계입니다. 실험에 따르면 감지는 얼굴 인식 정확도를 최대 42%까지 높이고 정렬은 최대 6%까지 높입니다. OpenCV, Ssd, Dlib, MtCnn, Faster MtCnn, RetinaFace, MediaPipe, Yolo, 감지기 YuNet는 CenterFacedeepface에 래핑됩니다.

모든 deepface 함수는 선택적 감지기 백엔드와 정렬 입력 인수를 허용합니다. 이러한 인수를 사용하여 감지기와 정렬 모드 사이를 전환할 수 있습니다. OpenCV가 기본 감지기이고 정렬은 기본적으로 켜져 있습니다.

backends = [
    'opencv', 'ssd', 'dlib', 'mtcnn', 'fastmtcnn',
    'retinaface', 'mediapipe', 'yolov8', 'yolov11s',
    'yolov11n', 'yolov11m', 'yunet', 'centerface',
]
detector = backends[3]
align = True

obj = DeepFace.verify(
  img1_path = "img1.jpg", img2_path = "img2.jpg", detector_backend = detector, align = align
)

dfs = DeepFace.find(
  img_path = "img.jpg", db_path = "my_db", detector_backend = detector, align = align
)

embedding_objs = DeepFace.represent(
  img_path = "img.jpg", detector_backend = detector, align = align
)

demographies = DeepFace.analyze(
  img_path = "img4.jpg", detector_backend = detector, align = align
)

face_objs = DeepFace.extract_faces(
  img_path = "img.jpg", detector_backend = detector, align = align
)


얼굴 인식 모델은 실제로 CNN 모델이며 표준 크기의 입력을 기대합니다. 따라서 표현하기 전에 크기 조정이 필요합니다. 변형을 피하기 위해 deepface는 감지 및 정렬 후 대상 크기 인수에 따라 검은색 패딩 픽셀을 추가합니다.

RetinaFace  MtCnn은 감지 및 정렬 단계에서 성능이 뛰어난 것으로 보이지만 훨씬 느립니다. 파이프라인 속도가 더 중요하다면 opencv나 ssd를 사용해야 합니다. 반면 정확도를 고려한다면 retinaface나 mtcnn을 사용해야 합니다.

다음 그림에서 볼 수 있듯이 RetinaFace의 성능은 군중 속에서도 매우 만족스럽습니다. 게다가 놀라운 얼굴 랜드마크 감지 성능이 함께 제공됩니다. 강조된 빨간색 점은 눈, 코, 입과 같은 얼굴 랜드마크를 보여줍니다. 그래서 RetinaFace의 정렬 점수도 높습니다.

옐로우 엔젤스 - 페네르바흐체 여자 배구 팀


RetinaFace에 대해 더 자세히 알아보려면 이 저장소를 방문하세요 .


실시간 분석 - Demo,  React Demo part-i, React Demo part-ii


실시간 비디오에도 deepface를 실행할 수 있습니다. 스트림 기능은 웹캠에 액세스하여 얼굴 인식과 얼굴 속성 분석을 모두 적용합니다. 이 기능은 얼굴에 5프레임 연속으로 초점을 맞출 수 있는 경우 프레임을 분석하기 시작합니다. 그런 다음 5초 동안 결과를 보여줍니다.

DeepFace.stream(db_path = "C:/database")

얼굴 인식은 원샷 학습에 기반을 두고 있지만, 한 사람의 얼굴 사진을 여러 장 사용할 수도 있습니다. 아래 그림과 같이 디렉토리 구조를 재정렬해야 합니다.

user
├── database
│   ├── Alice
│   │   ├── Alice1.jpg
│   │   ├── Alice2.jpg
│   ├── Bob
│   │   ├── Bob.jpg


브라우저에서 직접 얼굴 확인이나 분석 작업을 수행하려는 경우, deepface-react-ui deepface api에 따라 ReactJS를 사용하여 구축된 별도의 저장소가 있습니다.


얼굴 안티 스푸핑 - Demo


DeepFace에는 또한 주어진 이미지가 진짜인지 가짜인지 이해하기 위한 안티 스푸핑 분석 모듈이 포함되어 있습니다. 이 기능을 활성화하려면 anti_spoofingDeepFace 작업에서 인수를 True로 설정합니다.


# anti spoofing test in face detection
face_objs = DeepFace.extract_faces(img_path="dataset/img1.jpg", anti_spoofing = True)
assert all(face_obj["is_real"] is True for face_obj in face_objs)

# anti spoofing test in real time analysis
DeepFace.stream(db_path = "C:/database", anti_spoofing = True)


API - Demo,Docker Demo


DeepFace는 API도 제공합니다 api folder. 자세한 내용은 를 참조하세요. deepface 소스 코드를 복제하고 다음 명령으로 API를 실행할 수 있습니다. 이 명령은 gunicorn 서버를 사용하여 REST 서비스를 시작합니다. 이런 식으로 모바일 앱이나 웹과 같은 외부 시스템에서 deepface를 호출할 수 있습니다.

cd script

# run the service directly
./service.sh

# run the service via docker
./dockerize.sh

API에는 얼굴 인식, 얼굴 속성 분석 및 벡터 표현 기능이 포함되어 있습니다. 이러한 기능은 http post 메서드로 호출해야 합니다. 기본 서비스 엔드포인트는 http://localhost:5005/verify는 얼굴 인식, http://localhost:5005/analyze는 얼굴 속성 분석 및 http://localhost:5005/represent 는 벡터 표현을 위한 것입니다. API는 파일 업로드(양식 데이터를 통해) 또는 정확한 이미지 경로, URL 또는 base64 인코딩된 문자열(JSON 또는 양식 데이터를 통해)로 이미지를 허용하여 다양한 클라이언트 요구 사항에 대한 다양한 옵션을 제공합니다. 여기에서 이러한 메서드를 호출하는 방법을 알아보려면 postman 프로젝트를 찾을 수 있습니다.


대규모 얼굴 인식 - Playlist


Vector Similarity Search for Machine Learning

Embark on an enlightening journey into the realm of vector search with our meticulously curated YouTube playlist. Delve into the intricacies of approximate n...

www.youtube.com


작업에 대규모 데이터 세트에서 얼굴 인식이 필요한 경우 DeepFace를 벡터 인덱스 또는 벡터 데이터베이스와 결합해야 합니다. 이 설정은 정확한 검색 대신 근사적 최근접 이웃 검색을 수행하여 밀리초 내에 수십억 개의 항목이 포함된 데이터베이스에서 얼굴을 식별할 수 있습니다. 일반적인 벡터 인덱스 솔루션에는 Annoy , Faiss , Voyager , NMSLIB , ElasticSearch 가 있습니다 . 벡터 데이터베이스의 경우 인기 있는 옵션은 pgvector 확장 기능이 있는 Postgres  RediSearch 입니다 .

반대로, 작업에 중소 규모 데이터베이스에서의 얼굴 인식이 포함된다면 Postgres , SQLite 와 같은 관계형 데이터베이스 나 Mongo , Redis , Cassandra 와 같은 NoSQL 데이터베이스를 사용하여 정확한 최근접 이웃 검색을 수행할 수 있습니다.

임베딩 암호화 - Demo with PHE, Tutorial for PHE, Demo with FHE,Tutorial for FHE

벡터 임베딩은 원본 이미지로 되돌릴 수 없지만 지문과 같은 민감한 정보가 여전히 포함되어 있어 보안이 중요합니다. 임베딩을 암호화하는 것은 민감한 정보를 조작하거나 추출할 수 있는 적대적 공격을 방지하기 위해 보안 수준이 높은 애플리케이션에 필수적입니다. AES와 같은 기존 암호화 방법은 매우 안전하지만 거리 계산을 위해 클라우드 컴퓨팅 파워를 안전하게 활용하는 데 제한이 있습니다. 여기서 암호화된 데이터에 대한 계산을 허용하는 동형 암호화는 강력한 대안을 제공합니다.

from lightphe import LightPHE

# build an additively homomorphic cryptosystem (e.g. Paillier) on-prem
cs = LightPHE(algorithm_name = "Paillier", precision = 19)

# define plain vectors for source and target
alpha = DeepFace.represent("img1.jpg")[0]["embedding"]
beta = DeepFace.represent("target.jpg")[0]["embedding"]

# encrypt source embedding on-prem - private key not required
encrypted_alpha = cs.encrypt(alpha)

# dot product of encrypted & plain embedding in cloud - private key not required
encrypted_cosine_similarity = encrypted_alpha @ beta

# decrypt similarity on-prem - private key required
calculated_similarity = cs.decrypt(encrypted_cosine_similarity)[0]

# verification
print("same person" if calculated_similarity >= 1 - threshold else "different persons")

# proof of work
assert abs(calculated_similarity - sum(x * y for x, y in zip(alpha, beta))) < 1e-2


이 방식에서는 클라우드의 계산 능력을 활용하여 암호화된 코사인 유사도를 계산합니다. 그러나 클라우드는 수행하는 실제 계산에 대해 전혀 알지 못합니다. 이것이 바로 동형 암호화의 마법 입니다 ! 온프레미스 측의 비밀 키 보유자만 암호화된 코사인 유사도를 해독하고 쌍이 같은 사람을 나타내는지 다른 개인을 나타내는지 확인할 수 있습니다. LightPHE라이브러리를 확인하여 부분 동형 암호화에 대해 자세히 알아보세요.

Contribution

풀 리퀘스트는 언제나 환영합니다! 대규모 패치를 기여할 계획이라면, 먼저 이슈를 생성하여 사전 질문이나 디자인 결정을 먼저 해결하세요.

PR을 만들기 전에 명령을 실행하여 로컬에서 단위 테스트와 린팅을 실행해야 합니다 make test && make lint. PR이 전송되면 GitHub 테스트 워크플로가 자동으로 실행되고 단위 테스트 및 린팅 작업은 승인 전에 GitHub 작업 에서 사용할 수 있습니다.

Support

프로젝트를 지원하는 방법은 여러 가지가 있습니다. GitHub 저장소를 starring⭐️하는 것은 그 중 하나입니다 🙏

이 작업이 마음에 든다면 Patreon , GitHub Sponsors 또는 Buy Me a Coffee 에서 재정적으로 지원할 수 있습니다 . 또한, 골드, 실버 또는 브론즈 티어의 스폰서가 되면 회사 로고가 GitHub의 README에 표시됩니다.

Citation

연구에 도움이 된다면 출판물에서 deepface를 인용해 주세요.


S. Serengil 및 A. Ozpinar, "얼굴 인식 파이프라인의 벤치마크 및 모듈의 공동 사용성 성능" , 정보 기술 저널 , 제17권, 제2호, 95-107쪽, 2024년.

@article{serengil2024lightface,
  title     = {A Benchmark of Facial Recognition Pipelines and Co-Usability Performances of Modules},
  author    = {Serengil, Sefik and Ozpinar, Alper},
  journal   = {Journal of Information Technologies},
  volume    = {17},
  number    = {2},
  pages     = {95-107},
  year      = {2024},
  doi       = {10.17671/gazibtd.1399077},
  url       = {https://dergipark.org.tr/en/pub/gazibtd/issue/84331/1399077},
  publisher = {Gazi University}
}


SI Serengil 및 A. Ozpinar, "LightFace: 하이브리드 딥 페이스 인식 프레임워크" , 2020년 지능형 시스템 및 애플리케이션 혁신 컨퍼런스(ASYU) , 2020, 23-27쪽.


SI Serengil 및 A. Ozpinar, "HyperExtended LightFace: 얼굴 속성 분석 프레임워크" , 2021 국제 엔지니어링 및 신흥 기술 컨퍼런스(ICEET) , 2021, pp. 1-4.


또한, GitHub 프로젝트에서 deepface를 사용하는 경우 . deepface을 추가하세요 requirements.txt.

특허

DeepFace는 MIT 라이선스에 따라 라이선스가 부여되었습니다. LICENSE자세한 내용은 여기에서 확인하세요.

DeepFace는 일부 외부 얼굴 인식 모델을 래핑합니다: VGG-Face , Facenet (128d와 512d 모두), OpenFace, DeepFace, DeepID, ArcFace, Dlib, SFace, GhostFaceNet  Buffalo_L . 또한, 연령, 성별 및 인종/민족 모델은 전이 학습을 통해 VGG-Face의 백본에서 학습되었습니다.

마찬가지로, DeepFace는 많은 얼굴 감지기를 래핑합니다: OpenCv , Ssd , Dlib , MtCnn , Fast MtCnn , RetinaFace , MediaPipe , YuNet , Yolo  CenterFace . 마지막으로, DeepFace는 선택적으로 얼굴 스푸핑 방지를 사용하여 제공된 이미지가 진짜인지 가짜인지 판별합니다. 해당 모델을 활용하려는 경우 라이선스 유형이 상속됩니다. 프로덕션 목적으로 해당 모델의 라이선스 유형을 확인하세요.


DeepFace 로고는 Adrien Coquet가 제작하였으며 크리에이티브 커먼즈: 저작자표시 3.0 라이선스 에 따라 라이선스가 부여되었습니다 .

728x90
반응형
728x90
반응형

Gemma - Run with Ollama (with Colab)

Google Colab에서 Ollama로 Gemma 실행하기

이 노트북은 Ollama를 사용하여 Gemma 모델에서 추론을 실행하는 방법을 보여줍니다 . Ollama는 로컬에서 LLM을 실행하기 위한 사용하기 쉬운 솔루션이며 Gemma가 기본으로 지원됩니다.


Gemma는 Google DeepMind에서 구축한 경량의 최첨단 개방형 모델 제품군입니다. 버전 1.1로 업데이트되었습니다.

Gemma는 2b 및 7b 매개변수 크기로 제공됩니다.

  • ollama run gemma:2b
  • ollama run gemma:7b (default)

gemma 모델정보 확인

gemma 7b


gemma 2b


Colab 링크

Ollama 설치

공식 설치 스크립트를 통해 Ollama를 설치합니다.

!curl -fsSL https://ollama.com/install.sh | sh
>>> Installing ollama to /usr/local
>>> Downloading Linux amd64 bundle
############################################################################################# 100.0%
>>> Creating ollama user...
>>> Adding ollama user to video group...
>>> Adding current user to ollama group...
>>> Creating ollama systemd service...
WARNING: Unable to detect NVIDIA/AMD GPU. Install lspci or lshw to automatically detect and install GPU dependencies.
>>> The Ollama API is now available at 127.0.0.1:11434.
>>> Install complete. Run "ollama" from the command line.


Ollama 시작 (실행)

nohup을 사용하여 백그라운드에서 Ollama를 시작합니다. API 서비스 포트는 11434 입니다.

!nohup ollama serve > ollama.log &
nohup: redirecting stderr to stdout


Ollama 모델 목록 확인

!ollama list
NAME    ID    SIZE    MODIFIED


추론

명령행(command line)을 이용해서 gemma 7B 모델을 받고 추론을 실행 

!ollama run gemma:7b "대한민국의 수도는 어디야?" 2> ollama.log
대한민국의 수도는 서울입니다.</end_of_turn>


영어로 질문해봅니다.

ollama run gemma:7b "What is the capital of Korea?" 2> ollama.log
The capital of Korea is **Seoul**. It is the largest and most populous city in the country.


실행한 모델 확인

!ollama list
NAME        ID              SIZE      MODIFIED       
gemma:7b    a72c7f4d0a15    5.0 GB    41 seconds ago


REST 엔드포인트를 통해 응답 생성

!curl http://localhost:11434/api/generate -d '{ \
  "model": "gemma:7b", \
  "prompt":"프랑스의 수도는 어디야?" \
}'
{"model":"gemma:7b","created_at":"2024-09-20T07:43:59.191815259Z","response":"프","done":false}
{"model":"gemma:7b","created_at":"2024-09-20T07:43:59.238195689Z","response":"랑","done":false}
{"model":"gemma:7b","created_at":"2024-09-20T07:43:59.284446079Z","response":"스","done":false}
{"model":"gemma:7b","created_at":"2024-09-20T07:43:59.330415772Z","response":"의","done":false}
{"model":"gemma:7b","created_at":"2024-09-20T07:43:59.376395312Z","response":" 수","done":false}
{"model":"gemma:7b","created_at":"2024-09-20T07:43:59.404399661Z","response":"도","done":false}
{"model":"gemma:7b","created_at":"2024-09-20T07:43:59.431299982Z","response":"는","done":false}
{"model":"gemma:7b","created_at":"2024-09-20T07:43:59.45782401Z","response":" 파","done":false}
{"model":"gemma:7b","created_at":"2024-09-20T07:43:59.487122476Z","response":"리","done":false}
{"model":"gemma:7b","created_at":"2024-09-20T07:43:59.514609513Z","response":"(","done":false}
{"model":"gemma:7b","created_at":"2024-09-20T07:43:59.540247914Z","response":"Paris","done":false}
{"model":"gemma:7b","created_at":"2024-09-20T07:43:59.565826889Z","response":")","done":false}
{"model":"gemma:7b","created_at":"2024-09-20T07:43:59.592181701Z","response":"입니다","done":false}
{"model":"gemma:7b","created_at":"2024-09-20T07:43:59.619404725Z","response":".","done":false}
{"model":"gemma:7b","created_at":"2024-09-20T07:43:59.646506512Z","response":"","done":true,"done_reason":"stop","context":[968,2997,235298,559,235298,15508,235313,1645,108,237964,239566,236354,236137,22618,236840,236214,53355,238173,238305,181537,615,235298,559,235298,15508,235313,108,235322,2997,235298,559,235298,15508,235313,2516,108,237964,239566,236354,236137,22618,236840,236214,59994,236432,235278,29437,235275,47555,235265],"total_duration":650239442,"load_duration":39196479,"prompt_eval_count":37,"prompt_eval_duration":114387000,"eval_count":15,"eval_duration":454674000}


REST 엔드포인트를 통해 Gemma와 채팅

!curl http://localhost:11434/api/chat -d '{ \
  "model": "gemma:7b", \
  "messages": [ \
    { "role": "user", "content": "스페인의 수도는 어디야?" } \
  ] \
}'
{"model":"gemma:7b","created_at":"2024-09-20T07:44:05.627626051Z","message":{"role":"assistant","content":"스"},"done":false}
{"model":"gemma:7b","created_at":"2024-09-20T07:44:05.673755341Z","message":{"role":"assistant","content":"페"},"done":false}
{"model":"gemma:7b","created_at":"2024-09-20T07:44:05.719617417Z","message":{"role":"assistant","content":"인"},"done":false}
{"model":"gemma:7b","created_at":"2024-09-20T07:44:05.765324012Z","message":{"role":"assistant","content":"의"},"done":false}
{"model":"gemma:7b","created_at":"2024-09-20T07:44:05.810472803Z","message":{"role":"assistant","content":" 수"},"done":false}
{"model":"gemma:7b","created_at":"2024-09-20T07:44:05.842618919Z","message":{"role":"assistant","content":"도"},"done":false}
{"model":"gemma:7b","created_at":"2024-09-20T07:44:05.865453528Z","message":{"role":"assistant","content":"는"},"done":false}
{"model":"gemma:7b","created_at":"2024-09-20T07:44:05.892675721Z","message":{"role":"assistant","content":" 마"},"done":false}
{"model":"gemma:7b","created_at":"2024-09-20T07:44:05.922734686Z","message":{"role":"assistant","content":"드"},"done":false}
{"model":"gemma:7b","created_at":"2024-09-20T07:44:05.94894934Z","message":{"role":"assistant","content":"리"},"done":false}
{"model":"gemma:7b","created_at":"2024-09-20T07:44:05.974847995Z","message":{"role":"assistant","content":"드"},"done":false}
{"model":"gemma:7b","created_at":"2024-09-20T07:44:06.000792996Z","message":{"role":"assistant","content":"입니다"},"done":false}
{"model":"gemma:7b","created_at":"2024-09-20T07:44:06.027347034Z","message":{"role":"assistant","content":"."},"done":false}
{"model":"gemma:7b","created_at":"2024-09-20T07:44:06.054820407Z","message":{"role":"assistant","content":""},"done_reason":"stop","done":true,"total_duration":612398322,"load_duration":38850549,"prompt_eval_count":37,"prompt_eval_duration":104264000,"eval_count":14,"eval_duration":427080000}
 
728x90
반응형
728x90
반응형

설정

Colab 런타임 선택

Gemma 모델을 실행하기에 충분한 리소스가 포함된 Colab 런타임이 필요합니다. 이 경우 T4 GPU를 사용할 수 있습니다.

  1. Colab 창 오른쪽 상단에서 ▾(추가 연결 옵션)을 선택합니다.
  2. "런타임 유형 변경"을 선택합니다.
  3. 하드웨어 가속기에서 T4 GPU를 선택합니다.
런타임 유형 변경

T4 GPU 선택


런타임 유형 T4 선택완료


Gemma setup

Gemma 설정의 설정 지침을 완료해야 합니다. Gemma 설정 지침은 다음을 수행하는 방법을 보여줍니다.

  • kaggle.com에서 Gemma에 액세스하세요.
  • Gemma 2B 모델을 실행하기에 충분한 리소스가 있는 Colab 런타임을 선택하세요.
  • Kaggle 사용자 이름과 API 키를 Colab 비밀로 생성하고 구성합니다.

Gemma 설정을 완료한 후 다음 섹션으로 이동하여 Colab 환경에 대한 환경 변수를 설정합니다.


Kaggle API Key 생성


1. Kaggle에 로그인한후 Your Profile 선택

My Pofile

2. Settings 클릭해서 이동

3. API 항목중 Create New Token 클릭

4. 로걸에 다운로드된 kaggle.json 파일에서 username과 key값을 저장합니다.


{"username":"dongshik","key":"4a566********************9a7be40"}


자격 증명(credentials) 구성

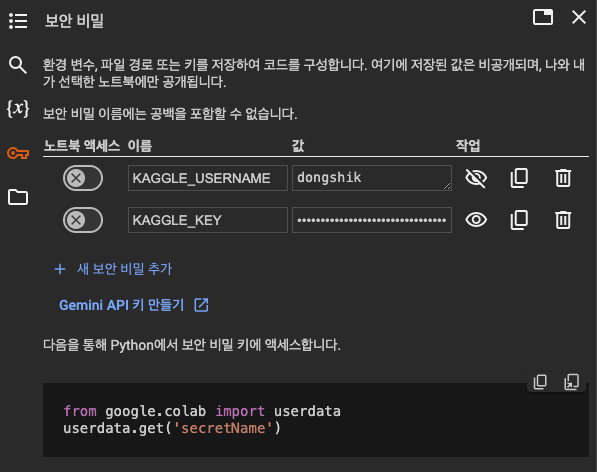
Kaggle 자격 증명을 Colab Secrets 관리자에 추가하여 안전하게 저장합니다.


  1. Google Colab 노트북을 열고 왼쪽 패널에서 🔑 Secrets 탭을 클릭합니다.
  2. 새 비밀번호 만들기 (+새 보안 비밀 추가) : KAGGLE_USERNAME 및 KAGGLE_KEY
  3. 사용자 이름을 KAGGLE_USERNAME에 복사하여 붙여넣으세요.
  4. KAGGLE_KEY에 키를 복사하여 붙여넣으세요.
  5. secret 에 대한 "노트북 액세스"를 허용하려면 왼쪽에 있는 버튼을 전환하세요.
Kaggle API Key 설정


Python에서 Kaggel Cerdential key 가져오기

import os
from google.colab import userdata

# Note: `userdata.get` is a Colab API. If you're not using Colab, set the env
# vars as appropriate for your system.
os.environ["KAGGLE_USERNAME"] = userdata.get("KAGGLE_USERNAME")
os.environ["KAGGLE_KEY"] = userdata.get("KAGGLE_KEY")


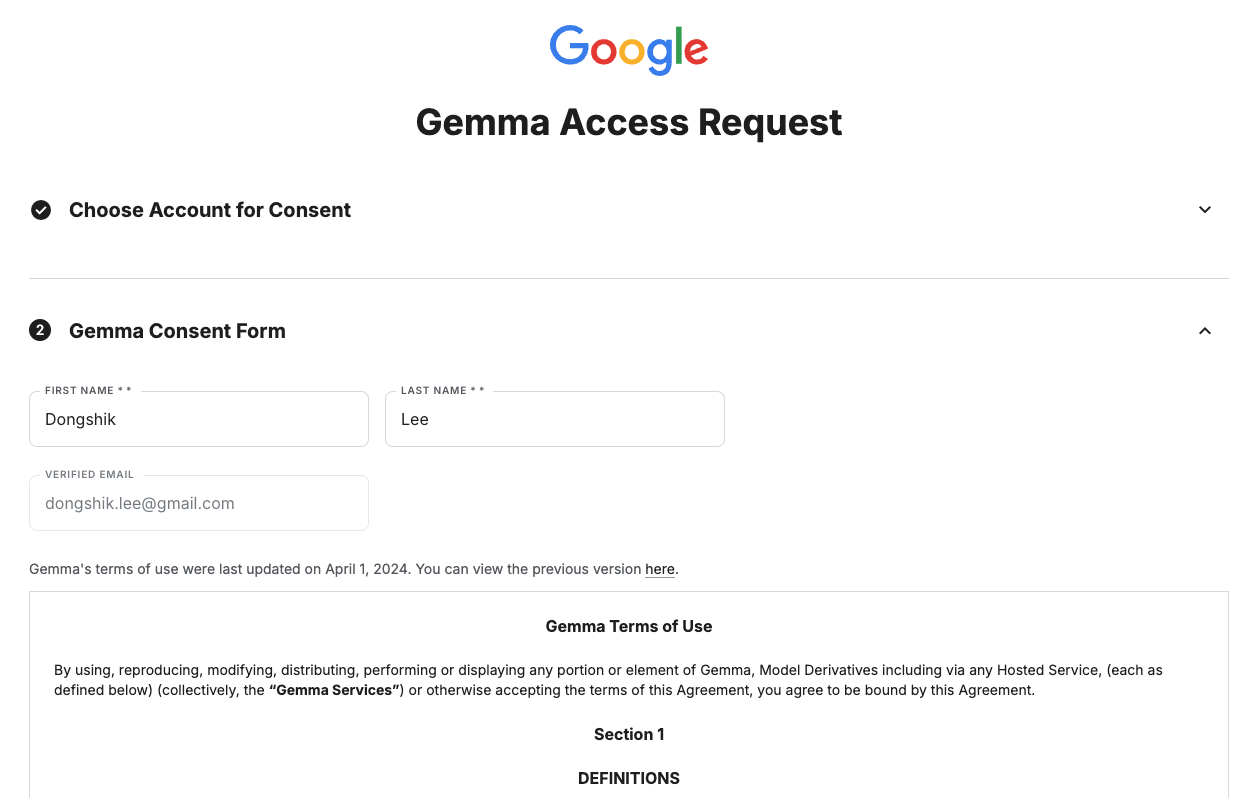
실행했을때 403 Client Error 발생하는경우 kaggle keras gemma 2에 대한 Access 권한이 없기때문입니다.

이럴때 kaggle keara gemma 2로 가서 Access 권한을 요청합니다.

...

You don't have permission to access resource at URL: https://www.kaggle.com/models/keras/gemma2/keras/gemma2_9b_en/2
Please make sure you are authenticated if you are trying to access a private resource or a resource requiring consent.


https://www.kaggle.com/models/keras/gemma2

Request Access 클릭


생략...

Term and Condition Accept


권한이 부여된것 확인

728x90
반응형
728x90
반응형

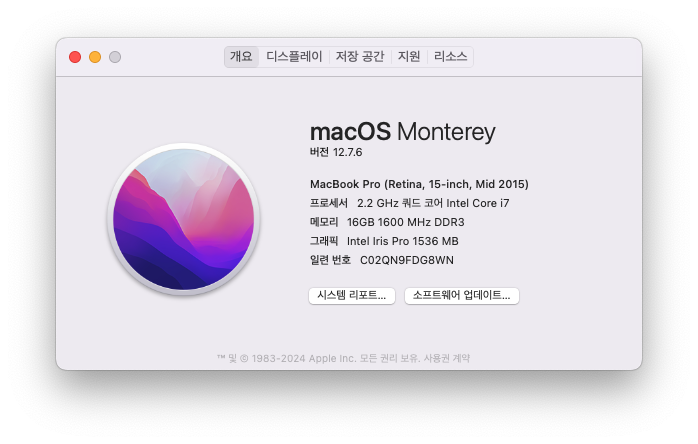
M1 교체 이전에 사용하던 MacBook Pro 2015에서 Ollama로 Gemma2를 구동해봤습니다.

MacBook Pro 2015


Processor: Multi-core CPU (Intel i5/i7/i9 or AMD equivalent)
Memory: You should have at least 8 GB of RAM available to run the 7B models, 16 GB to run the 13B models, and 32 GB to run the 33B models.
Storage: At least 20 GB of free space on an SSD
Operating System: Recent versions of Windows, macOS, or Linux


Python 3.11.4로 생성된 Conda 가상환경으로 실행합니다.

(base) Gabrielui-MacBookPro:~ gabriel$ conda env list
# conda environments:
#
base                  *  /usr/local/anaconda3
gabriel                  /usr/local/anaconda3/envs/gabriel

(base) Gabrielui-MacBookPro:~ gabriel$ conda activate gabriel
(gabriel) Gabrielui-MacBookPro:~ gabriel$

(gabriel) Gabrielui-MacBookPro:~ gabriel$ python -V
Python 3.11.4


세 가지 크기: 2B, 9B 및 27B 파라미터의 모델

셋중에서 9B 모델이 Default 입니다. 

(gabriel) Gabrielui-MacBookPro:~ gabriel$ ollama --version
ollama version is 0.3.9

(gabriel) Gabrielui-MacBookPro:~ gabriel$ ollama run gemma2
pulling manifest
pulling ff1d1fc78170... 100% ▕█████████████████████████████████████████████████████████████████▏ 5.4 GB
pulling 109037bec39c... 100% ▕█████████████████████████████████████████████████████████████████▏  136 B
pulling 097a36493f71... 100% ▕█████████████████████████████████████████████████████████████████▏ 8.4 KB
pulling 2490e7468436... 100% ▕█████████████████████████████████████████████████████████████████▏   65 B
pulling 10aa81da732e... 100% ▕█████████████████████████████████████████████████████████████████▏  487 B
verifying sha256 digest
writing manifest
success
>>>


다운로드한 모델을 확인합니다.

(gabriel) Gabrielui-MacBookPro:~ gabriel$ ollama list
NAME         	ID          	SIZE  	MODIFIED
gemma2:latest	ff02c3702f32	5.4 GB	14 minutes ago
(gabriel) Gabrielui-MacBookPro:~ gabriel$


Ollama + Gemma2 (9B)

ollama run gemma2 로 다운로드한 모델의 정보를 확인합니다.

>>> /show info
  Model
  	arch            	gemma2
  	parameters      	9.2B
  	quantization    	Q4_0
  	context length  	8192
  	embedding length	3584

  Parameters
  	stop	"<start_of_turn>"
  	stop	"<end_of_turn>"

  License
  	Gemma Terms of Use
  	Last modified: February 21, 2024

>>>


프롬프트로 질문 "why is the sky blue?"

>>> why is the sky blue?
The sky appears blue due to a phenomenon called **Rayleigh scattering**.

Here's a breakdown:

* **Sunlight:** Sunlight is made up of all the colors of the rainbow.
* **Atmosphere:** When sunlight enters Earth's atmosphere, it collides with tiny air molecules (mainly nitrogen and
oxygen).
* **Scattering:** These molecules scatter the sunlight in all directions.
* **Wavelengths:**  Blue light has a shorter wavelength than other colors in the visible spectrum. Shorter wavelengths are
scattered more effectively by the air molecules.

Therefore, blue light gets scattered much more than other colors, making the sky appear blue to our eyes.

**At sunrise and sunset:** The sunlight travels through more atmosphere to reach us. This means even more blue light is
scattered away, allowing longer wavelengths like orange and red to dominate, resulting in those beautiful hues.

>>> Send a message (/? for help)
Use Ctrl + d or /bye to exit.


REST 엔드포인트를 통해 응답 생성

(gabriel) Gabrielui-MacBookPro:~ gabriel$ curl http://localhost:11434/api/generate -d '{
>   "model": "gemma2",
>   "prompt": "Why is the sky blue?"
> }'
{"model":"gemma2","created_at":"2024-09-05T15:30:49.100401Z","response":"The","done":false}
{"model":"gemma2","created_at":"2024-09-05T15:30:49.464952Z","response":" sky","done":false}
{"model":"gemma2","created_at":"2024-09-05T15:30:49.798186Z","response":" appears","done":false}
{"model":"gemma2","created_at":"2024-09-05T15:30:50.143292Z","response":" blue","done":false}


{"model":"gemma2","created_at":"2024-09-05T15:32:05.437344Z","response":" have","done":false}
{"model":"gemma2","created_at":"2024-09-05T15:32:05.785728Z","response":" any","done":false}
{"model":"gemma2","created_at":"2024-09-05T15:32:06.14108Z","response":" other","done":false}
{"model":"gemma2","created_at":"2024-09-05T15:32:06.517148Z","response":" questions","done":false}
{"model":"gemma2","created_at":"2024-09-05T15:32:06.926336Z","response":"!","done":false}
{"model":"gemma2","created_at":"2024-09-05T15:32:07.269795Z","response":"","done":true,"done_reason":"stop","context":[106,1645,108,4385,603,573,8203,3868,235336,107,108,106,2516,108,651,8203,8149,3868,3402,577,476,27171,3151,5231,15599,44957,38497,168428,235248,109,4858,235303,235256,476,25497,235292,109,235287,5231,219715,66058,175521,603,4247,1644,908,576,832,573,9276,576,573,30088,235265,108,235287,5231,30962,235303,235256,117961,66058,3194,33365,30866,573,10379,235303,235256,13795,235269,665,1041,23524,675,16791,2681,24582,591,80711,23584,578,16175,846,108,235287,5231,102164,574,66058,3766,24582,17109,573,33365,575,832,16759,235265,235248,108,235287,5231,10716,181430,235256,66058,7640,2611,919,476,25270,35571,1178,1156,9276,575,573,12918,18303,235265,10323,576,736,235269,665,6803,30390,1683,978,731,573,2681,24582,1178,5543,95178,1154,3118,689,10436,235265,109,688,2339,235269,1212,783,1443,66058,109,651,30390,3868,2611,26676,1167,4628,774,832,16759,235269,3547,573,8203,4824,3868,235265,2625,48825,578,22097,235269,573,33365,37845,1593,978,576,573,13795,235265,1417,3454,573,3868,2611,603,30390,3024,1693,978,235269,15267,573,5543,95178,591,165117,578,72638,235275,577,6378,1167,4628,235269,10241,1941,4964,9276,235265,110,5331,682,1230,1013,692,791,1089,1156,3920,235341],"total_duration":81320587916,"load_duration":42868270,"prompt_eval_count":15,"prompt_eval_duration":3107284000,"eval_count":210,"eval_duration":78169448000}
(gabriel) Gabrielui-MacBookPro:~ gabriel$


REST 엔드포인트를 통해 Gemma와 채팅


(gabriel) Gabrielui-MacBookPro:~ gabriel$ curl http://localhost:11434/api/chat -d '{
>   "model": "gemma2",
>   "messages": [
>     {
>       "role": "user",
>       "content": "why is the sky blue?"
>     }
>   ]
> }'
{"model":"gemma2","created_at":"2024-09-05T15:32:34.118301Z","message":{"role":"assistant","content":"The"},"done":false}
{"model":"gemma2","created_at":"2024-09-05T15:32:34.466319Z","message":{"role":"assistant","content":" sky"},"done":false}
{"model":"gemma2","created_at":"2024-09-05T15:32:34.821353Z","message":{"role":"assistant","content":" appears"},"done":false}
{"model":"gemma2","created_at":"2024-09-05T15:32:35.182394Z","message":{"role":"assistant","content":" blue"},"done":false}
{"model":"gemma2","created_at":"2024-09-05T15:32:35.523289Z","message":{"role":"assistant","content":" due"},"done":false}

{"model":"gemma2","created_at":"2024-09-05T15:33:50.644094Z","message":{"role":"assistant","content":" if"},"done":false}
{"model":"gemma2","created_at":"2024-09-05T15:33:51.039595Z","message":{"role":"assistant","content":" you"},"done":false}
{"model":"gemma2","created_at":"2024-09-05T15:33:51.411561Z","message":{"role":"assistant","content":" have"},"done":false}
{"model":"gemma2","created_at":"2024-09-05T15:33:51.815174Z","message":{"role":"assistant","content":" any"},"done":false}
{"model":"gemma2","created_at":"2024-09-05T15:33:52.152768Z","message":{"role":"assistant","content":" other"},"done":false}
{"model":"gemma2","created_at":"2024-09-05T15:33:52.492949Z","message":{"role":"assistant","content":" questions"},"done":false}
{"model":"gemma2","created_at":"2024-09-05T15:33:52.915517Z","message":{"role":"assistant","content":"!"},"done":false}
{"model":"gemma2","created_at":"2024-09-05T15:33:53.27064Z","message":{"role":"assistant","content":""},"done_reason":"stop","done":true,"total_duration":80946825634,"load_duration":44007406,"prompt_eval_count":15,"prompt_eval_duration":1749943000,"eval_count":190,"eval_duration":79152305000}
(gabriel) Gabrielui-MacBookPro:~ gabriel$


Ollama + Gemma 1.1 (2B)


(gabriel) Gabrielui-MacBookPro:~ gabriel$ ollama run gemma:2b
pulling manifest
pulling manifest
pulling manifest
pulling manifest
pulling manifest
pulling manifest
pulling manifest
pulling manifest
pulling manifest
pulling manifest
pulling manifest
pulling manifest
pulling manifest
pulling manifest
pulling c1864a5eb193... 100% ▕██████████████████████████████████████████████████████████████████████████████████▏ 1.7 GB
pulling 097a36493f71... 100% ▕██████████████████████████████████████████████████████████████████████████████████▏ 8.4 KB
pulling 109037bec39c... 100% ▕██████████████████████████████████████████████████████████████████████████████████▏  136 B
pulling 22a838ceb7fb... 100% ▕██████████████████████████████████████████████████████████████████████████████████▏   84 B
pulling 887433b89a90... 100% ▕██████████████████████████████████████████████████████████████████████████████████▏  483 B
verifying sha256 digest
writing manifest
success
>>> Send a message (/? for help)


다운로드한 모델을 확인합니다.

(gabriel) Gabrielui-MacBookPro:~ gabriel$ ollama list
NAME         	ID          	SIZE  	MODIFIED
gemma:2b     	b50d6c999e59	1.7 GB	3 minutes ago
gemma2:latest	ff02c3702f32	5.4 GB	40 minutes ago
(gabriel) Gabrielui-MacBookPro:~ gabriel$


Gemma2와 동일한 질문을 합니다. "why is the sky blue?"

>>> why is the sky blue?
The sky appears blue due to Rayleigh scattering.

**Rayleigh scattering** is a scattering phenomenon where light waves are scattered in different directions depending on their wavelength.
Blue light has a shorter wavelength than other colors of light, meaning it scatters more effectively. This is why the sky appears blue.

Here's a more detailed explanation:

* **Sunlight** contains all colors of the rainbow.
* **Blue light** has a shorter wavelength than other colors.
* **When blue light** interacts with molecules in the atmosphere, it **scatters more strongly** than other colors.
* This scattering causes blue light to be scattered **towards the observer**.
* The scattered blue light is what we see in the sky as **blue color**.

**Other factors that contribute to the blue color of the sky:**

* **Dust particles:** Air molecules can also scatter light, but their scattering effect is generally weaker than that of molecules in the
atmosphere.
* **Water droplets:** Water droplets in the atmosphere can also scatter light, but their effect is typically less significant than that of
molecules.
* **Sun's position:** The sky appears blue because the sun is lower in the sky, meaning it is directly overhead. This means that more blue
light reaches our eyes.

In summary, the blue color of the sky is due to Rayleigh scattering of light by molecules in the atmosphere, which primarily results from
the shorter wavelength of blue light.

>>> Send a message (/? for help)


실행시에 MacBook의 성능을 확인합니다.


실행한 모델 정보 확인

>>> /show info
  Model
  	arch            	gemma
  	parameters      	3B
  	quantization    	Q4_0
  	context length  	8192
  	embedding length	2048

  Parameters
  	repeat_penalty	1
  	stop          	"<start_of_turn>"
  	stop          	"<end_of_turn>"

  License
  	Gemma Terms of Use
  	Last modified: February 21, 2024

>>> Send a message (/? for help)


Ollama + Gemma 1.1 (7B)

이번엔 Gemma 7B 모델을다운받아 테스트합니다.

(gabriel) Gabrielui-MacBookPro:~ gabriel$ ollama run gemma:7b
pulling manifest
pulling ef311de6af9d...  74% ▕█████████████████████████████████████████
pulling manifest
pulling ef311de6af9d...  74% ▕█████████████████████████████████████████
pulling manifest
pulling ef311de6af9d...  74% ▕█████████████████████████████████████████
pulling manifest
pulling ef311de6af9d... 100% ▕███████████████████████████████████████████████████████████████▏ 5.0 GB
pulling 097a36493f71... 100% ▕███████████████████████████████████████████████████████████████▏ 8.4 KB
pulling 109037bec39c... 100% ▕███████████████████████████████████████████████████████████████▏  136 B
pulling 65bb16cf5983... 100% ▕███████████████████████████████████████████████████████████████▏  109 B
pulling 0c2a5137eb3c... 100% ▕███████████████████████████████████████████████████████████████▏  483 B
verifying sha256 digest
writing manifest
success
>>> Send a message (/? for help)


다운로드한 모델 확인

(gabriel) Gabrielui-MacBookPro:~ gabriel$ ollama list
NAME             ID              SIZE      MODIFIED
gemma:7b         a72c7f4d0a15    5.0 GB    2 weeks ago
gemma:2b         b50d6c999e59    1.7 GB    2 weeks ago
gemma2:latest    ff02c3702f32    5.4 GB    2 weeks ago


Gemma2와 동일한 질문을 합니다. "why is the sky blue?"

>>> why is the sky blue?
**The sky is blue due to a phenomenon called Rayleigh scattering.**

* Sunlight is composed of all the colors of the rainbow, each with a different wavelength.
* Shorter wavelengths of light, such as blue light, have higher energy and more tightly spaced photons.
* When sunlight interacts with molecules in the atmosphere, such as nitrogen and oxygen, the shorter wavelengths are
scattered more effectively.

**Here's how it works:**

1. Sunlight enters the atmosphere and interacts with molecules of nitrogen and oxygen.
2. These molecules have electrons that can be excited by the energy of the incoming light.
3. The electrons absorb the energy and vibrate, then emit it in all directions.
4. However, **blue light is scattered more efficiently than other colors** because its shorter wavelength allows for more
frequent collisions between the photons and the molecules.

**This scattering process results in:**

* More blue light is scattered in all directions, reaching our eyes and making the sky appear blue.
* Longer wavelengths of light, such as red light, are scattered less efficiently, so we see more of them directly from
the sun.

**Additional factors influencing the sky's color:**

* **Time of day:** The sky is generally bluer at midday when the sunlight travels through less atmosphere.
* **Cloud cover:** Clouds can block the sunlight and scatter less blue light, making the sky appear less blue.
* **Pollution:** Pollution in the atmosphere can also scatter light and affect the sky's color.

>>> Send a message (/? for help)


실행한 모델 정보 확인

>>> /show info
  Model
  	arch            	gemma
  	parameters      	9B
  	quantization    	Q4_0
  	context length  	8192
  	embedding length	3072

  Parameters
  	penalize_newline	false
  	repeat_penalty  	1
  	stop            	"<start_of_turn>"
  	stop            	"<end_of_turn>"

  License
  	Gemma Terms of Use
  	Last modified: February 21, 2024

>>> Send a message (/? for help)


질의 성능 확인

모델 실행 성능 확인


Intel CPU의 MacBook에서 Gemma2 9B 모델 그리고 Gemma 2B, 7B 모델까지 Ollama로 구동해 봤습니다.

감사합니다.


728x90
반응형
728x90
반응형

관심가는 주제가 있어서 내용 읽어보면서 번역해봅니다.


http://www.nltk.org/book_1ed/ch07.html

텍스트에서 정보를 추출하는 간단한 방법은 다음과 같습니다.


  1. 텍스트를 문장으로 분할하기
  2. 그 다음 문장을 단어로 토큰화하기 (tokenize)
  3. 각 토큰의 품사(part-of-speech)를 파악하기 (이는 다음 단계를 가능하게 함)
  4. 개체 탐지하기 (Entity detection)
  5. 마지막으로 서로 다른 개체/토큰 간의 관계 파악하기

이러한 단계들을 통해, 우리는 의미 있는 정보를 추출할 수 있게 됩니다. 이 정보는 추가적인 처리에 사용할 수 있으며, 주제 감정 탐지(subject sentiment detection), 주제 식별(theme identification), 사전 생성(dictionary creation) 텍스트 태깅(text tagging) 등과 같은 더 정교한 작업을 수행하는 데 활용할 수 있습니다.


이 짧은 글을 통해, 우리는 5단계 정보 추출 과정의 기본 구성 요소를 형성하는 **문법 청킹(Grammar Chunking)**을 탐구하고자 합니다.


문법 청킹(Grammar Chunking)은 문장에서 다중 토큰 구문(pharses)을 품사 태깅과 함께 추출하는 기술입니다. 문장은 문장(Setence) → 절(Clauses) → 구(Pharses) → 단어(Words)로 구성된 계층적 문법 구조를 따릅니다. 청킹은 사용자가 의식적으로 또는 무의식적으로 찾고 있는 품사 태그 패턴을 기반으로 문장의 일부, 즉 구를 선택합니다.


예를 들어, 모든 문장에는 다섯 가지 주요 "의미 있는 구" 범주가 있습니다 - 명사구(NP), 동사구(VP), 형용사구(ADJP), 부사구(ADVP), 전치사구(PP). 이러한 구 유형을 텍스트에서 추출하고 더 나아가 관계를 설정하거나 개체를 식별하거나 필요에 따라 필터링하면, 80%의 경우에 이 간단한 추출만으로도 텍스트 데이터를 이해하고 다른 NLP 작업을 진행하는 데 필요한 정보를 얻을 수 있습니다.


전통적으로 문법 청킹을 수행하는 다양한 방법이 있습니다:

  1. 태그 패턴
  2. 정규 표현식을 이용한 청킹(Chunking)
  3. 텍스트 말뭉치(Corpora)
  4. 규칙 기반 청킹
  5. 통계 기반 청킹

우리는 이를 새로운 응용 머신러닝 관점에서 살펴볼 것입니다. 모든 프로그래밍 복잡성을 숨기기 위해 - 우리는 spaCy 라이브러리를 사용할 것입니다 (spaCy는 고급 NLP를 위한 무료 오픈 소스 라이브러리입니다. 빠르고 정확합니다). 이 라이브러리는 위에서 나열한 5단계를 수행하기 위한 매우 사용하기 쉬운 인터페이스를 제공합니다.

물론, 내장 라이브러리의 경우와 마찬가지로 우리는 특정한 유연성을 잃게 되지만, 일부 유연성을 회복하기 위해 추가적인 프로그래밍을 어떻게 구축하는지도 간단히 다룰 것입니다.


우리는 해결책을 개발하기 위해 Python과 Jupyter Notebook을 사용할 것입니다. 데이터는 스크랩한 샘플 뉴스 기사가 될 것입니다. Jupyter Notebook과 사용된 샘플 데이터는 GitHub에서 액세스할 수 있습니다.


(이 접근 방식을 통해 실제 데이터로 작업하면서 spaCy를 사용한 NLP 작업을 실습할 수 있습니다. GitHub 저장소를 통해 코드와 데이터를 쉽게 공유하고 접근할 수 있어, 다른 사람들도 이 예제를 따라 해볼 수 있습니다.)


몇 가지 필요한 라이브러리를 임포트하는 것으로 시작하겠습니다.


import pandas as pd, os, re, string
import numpy as np
import spacy

#'en_core_web_md' is a General-purpose pretrained model to predict named entities, 
#part-#of-speech tags and syntactic dependencies. 
#Can be used out-of-the-#box and fine-tuned on more specific data.

nlp = spacy.load('en_core_web_md')
comp=pd.read_excel(r'C:\Saurabh\Publication\Chunking\Chunk_data.xlsx')
print(len(comp))
print(comp.dtypes)
print(comp['Text'].astype(str))
2
Text    object
dtype: object
0    Ruth Bader Ginsburg was an associate justice o...
1    I opened a savings account at Wells Fargo in D...


Ruth Ginsberg에 관한 첫 번째 샘플 단락을 사용하여 개념을 설명하겠습니다. 참고로, 우리는 'en_core_web_md'라는 spaCy의 범용 사전 학습된 모델을 사용하여 명명된 엔티티(named entities), 품사 태그(part-of-speech tags), 구문적 의존성(syntactic dependencies)을 예측합니다. 이 모델은 바로 사용할 수 있으며, 더 특정한 데이터에 맞춰 미세 조정할 수도 있습니다.


이제 문장 토크나이저를 사용하여 문장을 추출해보겠습니다.


comp['sentence'] = comp['Text'].apply(lambda x: sent_tokenize(x))
print(len(comp['sentence'][0]))
comp['sentence_clean'] = comp['sentence']
print(comp['sentence_clean'])
comp_subset = pd.DataFrame(comp['sentence_clean'][0], columns=['sentence_clean'])
comp_subset
2
0    [Ruth Bader Ginsburg was an associate justice ...
1    [I opened a savings account at Wells Fargo in ...


텍스트를 문장 목록으로 변환한 것을 볼 수 있습니다. 확장 가능한 프로세스를 설정하기 위해 문장을 세로형 Dataframe으로 변환합니다. 샘플 단락에 대해 설정하고 있지만, 이 작업의 목적을 이해하시리라 생각합니다. 이 방식은 여러 단락과 문장에 대해 적용할 수 있습니다.


comp_subset = pd.DataFrame(comp['sentence_clean'][0], columns=['sentence_clean'])
comp_subset


이제 다음 두 단계를 진행하겠습니다. 단어 토큰화(tokenization)와 품사 태깅(POS tagging)입니다. spaCy를 사용하면 이 작업이 얼마나 쉬운지 확인해보세요. onegram 메서드는 단어(토큰), 품사 태깅, 그리고 텍스트 분석 작업에서 유용한 다양한 정보를 출력합니다. 또한 이 메서드가 토큰과 품사를 어떻게 반환하는지도 주목해보세요. 나중에 n-grams을 생성해야 할 경우, n-grams과 품사 태깅을 생성하는 방법으로 이 메서드를 확장하는 방법도 보여드리겠습니다.


def onegram(text):
    doc = nlp(text)
    result = []
    print("{0:20} {1:20} {2:8} {3:8} {4:8} {5:8} {6:8} {7:8}".format("text", "lemma_", "pos_", "tag_", "dep_",
            "shape_", "is_alpha", "is_stop"))
    for token in doc:
        print("{0:20} {1:20} {2:8} {3:8} {4:8} {5:8} {6:8} {7:8}".format(token.text, token.lemma_, token.pos_, token.tag_, token.dep_,
            token.shape_, token.is_alpha, token.is_stop))
        #print(token.text, token.lemma_, token.pos_, token.tag_, token.dep_,
            #token.shape_, token.is_alpha, token.is_stop)
        result.append((token.text, token.tag_))
    return result
comp_subset = comp_subset[comp_subset.index==0]
comp_subset.head(1)['sentence_clean'].apply(onegram)


이 메서드는 실제 토큰(예: "was"), 어간(즉, 토큰의 기본형, 예: "be"), 품사(AUX), 품사 태깅(VBD), 문장에서 다른 단어에 대한 의존성(ROOT), 형태(즉, 소문자로 시작하는지, 알파벳만 있는지, 그리고 불용어인지 여부)를 제공합니다. 단 두 줄의 코드로 이 모든 정보를 얻을 수 있다는 것은 정말 놀랍습니다! 만약 NLTK를 사용해 본 적이 있다면, 이러한 정보를 얻기 위해 얼마나 많은 코드를 작성해야 하는지 아실 겁니다. 그리고 이 정보들은 매우 중요합니다. 불용어를 제거하고, 알파벳이 아닌 텍스트를 정리하며, 텍스트를 표제화(lemmatize)하고, 패턴을 교정하는 데 사용할 수 있습니다.


이제 우리의 목표로 돌아가서, 우리는 토큰과 품사를 얻었습니다. 그렇다면 한 단계 더 나아가 특정 패턴을 가진 단어 그룹(예: 명사구)을 식별할 수 있는 방법은 무엇일까요? 명사구(NP)는 선택적 한정사(DT) 뒤에 여러 형용사(JJ)가 오고 그 다음에 명사(NN)가 오는 단어들의 연속입니다.

def extractNP(text):
    doc = nlp(text)
    result = []
    for np in doc.noun_chunks:
        result.append(np.text)
    print(result)
    return result
comp_subset['sentence_clean'].apply(extractNP)
['Ruth Bader Ginsburg', 'an associate justice', 'the U.S. Supreme Court', 'nearly three decades']


이 출력은 문장 내의 모든 명사구를 보여줍니다. spaCy는 내장된 명사 청커를 제공하지만, 동사구, 형용사구 또는 특정 문법 패턴에 기반한 구가 필요한 경우, spaCy가 제공하는 토큰과 품사 정보를 사용하여 사용자 정의 함수를 만들 수 있습니다.

이제 정보 추출의 다음 단계로 넘어가 보겠습니다 - 서로 다른 토큰 간의 구문적 관계(syntactic relationship detection)를 탐지하는 것입니다. 이를 통해 우리는 문장 구조를 더 잘 이해하고 필요에 따라 특정 부분을 선택적으로 활용할 수 있습니다.


from spacy import displacy
def getdependency(text):
    doc = nlp(text)
    print("{0:20} {1:20} {2:20} {3:20} {4:30}".format("text", "dep_", "head", "head_pos_", "children"))
    for token in doc:
        print("{0:20} {1:20} {2:20} {3:20} {4:30}".format(token.text, token.dep_, token.head.text, token.head.pos_, 
                                                 " ".join([str(child) for child in token.children])))
    return
def getdisplay(text):
    doc = nlp(text)
    displacy.serve(doc, style="dep")
    return
comp_subset['sentence_clean'].apply(getdependency)
comp_subset['sentence_clean'].apply(getdisplay)


테이블과 시각 자료를 모두 읽어 head, children, 그리고 의존성을 이해할 수 있어야 합니다. 이 문장의 일부에서 Ginsburg는 명사 주어이며, Ruth와 Bader 모두 이에 의존합니다. "was"는 Ruth를 그녀의 직업인 justice(associate justice)와 연결하는 root입니다. 이는 문장의 일부에 대한 매우 간단한 해석입니다 - 다양한 열 제목의 의미를 이해하기 위해 추가 학습을 하시기를 권합니다. 그래야 직접 더 잘 해석할 수 있는 위치에 있게 될 것입니다.

관계 탐지는 중요하고 유용합니다 - 예를 들어, 감정 분석을 수행하고 있고 각 주제에 대한 작성자의 감정을 이해해야 한다고 가정해 봅시다. 이런 시나리오에서는 각 주제와 그 주제와 관련된 단어들을 식별할 수 있는 능력이 핵심이 됩니다.


마지막 부분인 개체 탐지로 넘어가겠습니다. 명명된 개체는 이름이 지정된 "실제 세계의 객체"입니다 - 예를 들어, 사람, 국가, 제품 또는 책 제목 등입니다. spaCy는 모델에 예측을 요청함으로써 문서 내의 다양한 유형의 명명된 개체(named entities)를 인식할 수 있습니다. 모델은 통계적이며 학습된 예제에 크게 의존하기 때문에, 이것이 항상 완벽하게 작동하는 것은 아니며 사용 사례에 따라 나중에 약간의 조정이 필요할 수 있습니다.

예를 들어, 문서 파싱 문제(예: 이력서 파싱)에 대해 작업하고 있고 사람이 공부한 학교 이름과 위치를 식별해야 한다고 가정해 봅시다. 이런 경우 개체 탐지가 유용할 것입니다. 이를 통해 문장을 실제 세계의 정보와 연결할 수 있습니다.


def getEntity(text):
    doc = nlp(text)
    for ent in doc.ents:
        print(ent.text, ent.start_char, ent.end_char, ent.label_)
    return
comp_subset['sentence_clean'].apply(getEntity)


개체 탐지를 통해 이제 Ruth Bader Ginsburg를 사람으로, U.S. Supreme Court를 조직으로 식별할 수 있습니다! 그리고 관계 탐지를 통해 Ruth가 associate justice라는 것을 알 수 있습니다. 따라서 이제 여러분과 기계는 Ruth Bader Ginsburg가 U.S. Supreme Court의 associate justice라는 것을 알 수 있게 되었습니다!


이 글이 마음에 들고 도움이 된다고 생각하신다면, 박수를 보내주세요!


저자 소개

Dr. Mahendra NayakMr. Saurabh Singh는 Accenture Applied Intelligence, 방갈로르의 수석 데이터 과학자입니다. 그들은 주로 대규모 비정형 데이터, 예측 모델링, 기계 학습, 그리고 기업 규모의 지능형 시스템 구축 분야에서 일하고 있습니다.


https://medium.com/@saurabhsingh_23777/grammar-chunking-and-text-information-extraction-140cd796d73b


Grammar Chunking and Text Information Extraction

Author: Dr. Mahendra Nayak and Saurabh Singh

medium.com


728x90
반응형
728x90
반응형


https://unstructured-io.github.io/unstructured/index.html


Unstructured 0.13.0 documentation

Next Introduction

unstructured-io.github.io


Unstructured 라이브러리는 downstream machine learning tasks에서 사용할 수 있도록 비구조화 텍스트 문서를 전처리하고 구조화하는 데 도움을 주도록 설계되었습니다. Unstructured 라이브러리를 사용하여 처리할 수 있는 문서 예시에는 PDF, XML 및 HTML 문서가 포함됩니다


Downstream Task 의미
구체적으로 풀고 싶은 문제들을 말한다.
최근 자연어 처리분야에서는 언어모델을 프리트레인(pre-train)방식을 이용해 학습을 진행하고, 그 후에 원하고자 하는 태스크를 파인 튜닝(fine-tuning) 방식을 통해 모델을 업데이트 하는 방식을 사용하는데 이때, 태스크를 다운스트림 태스크라 한다.
예를들어, 버트의 언어모델을 질의응답 태스크인 squad를 학습한다고 할때, 이때 질의응답 태스크를 다운스트림 태스크로 볼 수 있을것이다.

Core Functionality

Unstructured 라이브러리에는 원시(raw) 소스 문서를 분할, 청크, 정리 및 스테이징하는 기능이 포함되어 있습니다. 이러한 기능은 라이브러리 내에서 주요 공개 인터페이스로 작동합니다. 이 섹션을 읽은 후에는 다음을 이해할 수 있어야 합니다.


  • How to partition a document into json or csv.
    문서를 JSON 또는 CSV로 분할하는 방법:
    - Unstructured 라이브러리의 분할 함수를 사용하여 문서를 원하는 형식(JSON 또는 CSV)으로 분할할 수 있습니다. 이 함수는 문서를 적절한 크기로 나누고 각 부분을 원하는 형식으로 저장합니다.

  • How to remove unwanted content from document elements using cleaning functions.
    문서 요소에서 불필요한 내용을 제거하는 방법:
    - Unstructured 라이브러리의 정리 함수를 사용하여 문서 요소에서 불필요한 내용을 제거할 수 있습니다. 이 함수는 지정된 규칙에 따라 문서를 정리하고, 특정 패턴이나 문자열을 제거하여 요소를 정제합니다.

  • How to extract content from a document using the extraction functions.
    문서에서 콘텐츠를 추출하는 방법:
    - Unstructured 라이브러리의 추출 함수를 사용하여 문서에서 콘텐츠를 추출할 수 있습니다. 이 함수는 특정 유형의 데이터(예: 텍스트, 이미지, 표 등)를 문서에서 식별하고 추출합니다.

  • How to prepare data for downstream use cases using staging functions
    스테이징 기능을 사용하여 downstream 사용 사례에 대한 데이터를 준비하는 방법:
    -
    Unstructured 라이브러리의 스테이징 함수를 사용하여 downstream 사용 사례에 데이터를 준비할 수 있습니다. 이 함수는 추출된 콘텐츠를 적절한 형식으로 구성하고 저장하며, 후속 기계 학습 작업에 사용할 수 있는 형식으로 데이터를 준비합니다.
  • How to chunk partitioned documents for use cases such as Retrieval Augmented Generation (RAG).
    RAG(검색 보강 생성)과 같은 사용 사례를 위해 문서를 청크로 분할하는 방법:
    - Unstructured 라이브러리의 청크 함수를 사용하여 문서를 필요한 크기로 청크로 나눌 수 있습니다. 이 함수는 문서를 적절한 크기의 청크로 분할하여 특정 사용 사례에 적합하도록 준비합니다. RAG와 같은 사용 사례를 위해 필요한 크기로 문서를 청크로 분할할 수 있습니다.


https://github.com/Unstructured-IO/unstructured/blob/main/README.md


unstructured/README.md at main · Unstructured-IO/unstructured

Open source libraries and APIs to build custom preprocessing pipelines for labeling, training, or production machine learning pipelines. - Unstructured-IO/unstructured

github.com

Open-Source Pre-Processing Tools for Unstructured Data

구조화되지 않은 라이브러리는 PDF, HTML, Word 문서 등과 같은 이미지와 텍스트 문서를 수집하고 전처리하기 위한 오픈 소스 구성 요소를 제공합니다. 구조화되지 않은 사용 사례는 LLM의 데이터 처리 워크플로를 간소화하고 최적화하는 데 중점을 두고 있습니다. 비정형 모듈식 기능 및 커넥터는 데이터 수집 및 전처리를 단순화하는 응집력 있는 시스템을 형성하여 다양한 플랫폼에 적응할 수 있고 비정형 데이터를 정형 출력으로 변환하는 데 효율적입니다.


다중문서 처리에 아주좋은 라이브러리입니다. 


다른 스터디와 병행해서 문서를 계속 업데이트 할예정입니다.


Note!!!

Unstructured io를 이용해서 PDF로 OpenAI를 이용한 Multi modal 활용은 아래 페이지를 참조하세요.

https://amnesia.tistory.com/64


대용량 PDF를 위한 unstructured와 Multi-modal RAG에 대한 심층 분석

Overview끊임없이 진화하는 인공 지능 환경에서 보다 인간과 유사한 대화 에이전트를 만드는 것이 중심 초점이었습니다. 텍스트 기반 상호 작용이 크게 발전했지만 텍스트, 이미지

amnesia.tistory.com


728x90
반응형

+ Recent posts