Overview
끊임없이 진화하는 인공 지능 환경에서 보다 인간과 유사한 대화 에이전트를 만드는 것이 중심 초점이었습니다. 텍스트 기반 상호 작용이 크게 발전했지만 텍스트, 이미지, 문서 등 다양한 양식을 통합하면 사용자 경험이 더욱 풍부해지고 에이전트의 효과적인 이해 및 대응 능력이 향상됩니다. 이 영역에서 유망한 접근 방식 중 하나는 다중 모드 표현의 기능과 생성 모델의 기능을 통합하는 다중 모드 검색 증강 생성(Multi-modal Retrieval-Augmented Generative, RAG) 모델을 활용하는 것입니다.
이 글에는 angchain’s cookbook에 있는 Multi-Modal RAG의 재구현과 심층적인 설명이 포함되어 있습니다.
Understanding Multi-modal RAG
검색 강화 생성 모델(Retrieval-Augmented Generative models) 또는 RAG의 개념은 transformer와 같은 생성 모델의 강점과 검색 기반(retrieval-based) 기술을 결합할 수 있는 능력 덕분에 주목받고 있습니다.
검색기 구성 요소(retriever components)로 생성 모델을 강화함(augmenting)으로써 RAG 모델은 대규모 텍스트 말뭉치(corpora)의 기존 지식을 효과적으로 활용하여 응답을 향상시킬 수 있습니다.
이제 이 패러다임을 다중 모드 설정으로 확장한 Multi-modal RAG는 텍스트, 이미지, 문서와 같은 다양한 형식을 검색 및 생성 프로세스에 통합합니다. 이를 통해 대화 에이전트는 텍스트 입력뿐만 아니라 그에 수반되는 시각적 또는 문맥 정보를 기반으로 응답을 이해하고 생성할 수 있습니다.
설치
pip install "unstructured[all-docs]"
% pip list | grep unstructured
unstructured                             0.13.2
unstructured-client                      0.18.0
unstructured-inference                   0.7.25
unstructured.pytesseract                 0.3.12
Lets dive into technicalities
Multi-modal RAG 기반 대화 에이전트를 달성하기 위해 단계:

- Extract text, tables, and images from PDF files using partitioning techniques and document structure analysis.
분할 기술과 문서 구조 분석을 사용하여 PDF 파일에서 텍스트, 표 및 이미지를 추출 - Categorize extracted elements into text and tables based on their type.
추출된 요소를 유형에 따라 텍스트와 테이블로 분류 - Generate summaries for text elements using an OpenAI model, optionally splitting long texts into manageable chunks.
OpenAI 모델을 사용하여 텍스트 요소에 대한 요약을 생성하고 선택적으로 긴 텍스트를 관리 가능한 덩어리로 분할 - Encode images as base64 strings and summarize them using an OpenAI Vision model.
이미지를 base64 문자열로 인코딩하고 OpenAI Vision 모델을 사용하여 요약 - Create a multi-vector retriever to index summaries and raw contents of text, tables, and images.
텍스트, 표, 이미지의 요약과 원시 콘텐츠를 색인화하는 다중 벡터 검색기를 생성 - Initialize a vector store using the Chroma vector store with OpenAI embeddings.
OpenAI 임베딩이 포함된 Chroma 벡터 저장소를 사용하여 벡터 저장소를 초기화 - Construct a multi-modal RAG chain for processing user questions with both textual and visual context.
텍스트 및 시각적 컨텍스트를 모두 사용하여 사용자 질문을 처리하기 위한 다중 모드 RAG 체인을 구축 - Retrieve relevant documents based on a user query using the multi-vector retriever.
다중 벡터 검색기를 사용하여 사용자 쿼리를 기반으로 관련 문서를 검색 - Invoke the multi-modal RAG chain to generate a response to the user query.
다중 모드 RAG 체인을 호출하여 사용자 쿼리에 대한 응답을 생성
from langchain.text_splitter import CharacterTextSplitter
from unstructured.partition.pdf import partition_pdf


# Extract elements from PDF
def extract_pdf_elements(path, fname):
    """
    Extract images, tables, and chunk text from a PDF file.
    path: File path, which is used to dump images (.jpg)
    fname: File name
    """
    return partition_pdf(fname,
                        extract_images_in_pdf=True,
                        infer_table_structure=True,
                        chunking_strategy="by_title",
                        max_characters=4000,
                        new_after_n_chars=3800,
                        combine_text_under_n_chars=2000
    )

# Categorize elements by type
def categorize_elements(raw_pdf_elements):
    """
    Categorize extracted elements from a PDF into tables and texts.
    raw_pdf_elements: List of unstructured.documents.elements
    """
    tables = []
    texts = []
    for element in raw_pdf_elements:
        #print(element)
        #print(str(type(element)))
        if "unstructured.documents.elements.Table" in str(type(element)):
            print(str(type(element)))
            tables.append(str(element))
        elif "unstructured.documents.elements.CompositeElement" in str(type(element)):
            print(str(type(element)))
            texts.append(str(element))
    return texts, tables


# File path
fpath = "/Users/dongsik/github/Multi-Modal-using-RAG/Attention_is_all_you_need.pdf"
fname = "Attention_is_all_you_need.pdf"

# Get elements
raw_pdf_elements = extract_pdf_elements(fpath, fname)
#print(raw_pdf_elements)

# Get text, tables
texts, tables = categorize_elements(raw_pdf_elements)

# Optional: Enforce a specific token size for texts
text_splitter = CharacterTextSplitter.from_tiktoken_encoder(
    chunk_size=4000, chunk_overlap=0
)
joined_texts = " ".join(texts)
texts_4k_token = text_splitter.split_text(joined_texts)
1. extract_pdf_elements 함수는 unstructured.partition.pdf 모듈의 partition_pdf 메서드를 활용하여 PDF 파일에서 이미지, 테이블 및 청크 텍스트를 추출합니다.
2. categorize_elements 함수는 추출된 요소를 유형에 따라 텍스트와 테이블로 분류합니다.
3. 선택적으로 추출된 텍스트를 CharacterTextSplitter 클래스를 사용하여 특정 토큰 크기의 청크로 분할할 수 있습니다. 이 단계에는 청크 크기 및 겹침과 같은 매개변수를 사용하여 텍스트 분할기를 설정한 다음 결합된 텍스트를 청크로 분할하는 작업이 포함됩니다.
pdf에서 추출된 요소항목을 확인해보겠습니다.
print("raw_pdf_elements : ", raw_pdf_elements)
print(raw_pdf_elements[0].metadata)

import pandas as pd
# Convert JSON output into Pandas DataFrame
data = []
for c in raw_pdf_elements:
    #print(type(c).__name__)
    row = {}
    row['Element Type'] = type(c).__name__
    row['Filename'] = c.metadata.filename
    row['Date Modified'] = c.metadata.last_modified
    row['Filetype'] = c.metadata.filetype
    row['Page Number'] = c.metadata.page_number
    row['text'] = c.text
    data.append(row)
df = pd.DataFrame(data)
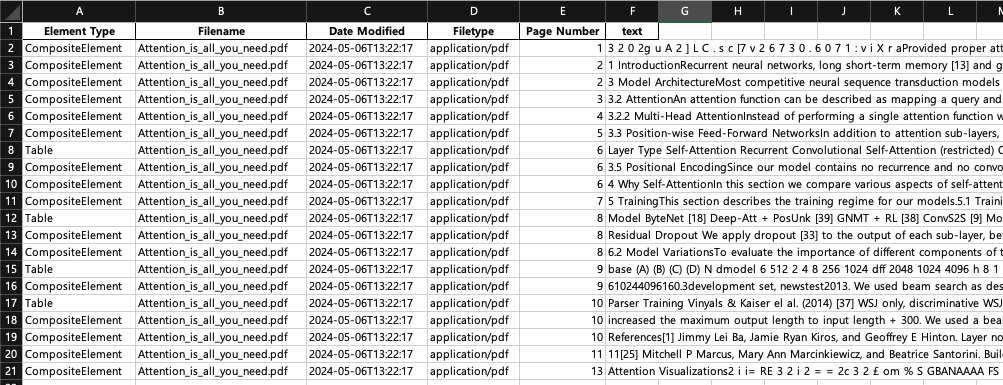
print(len(df))
df.to_excel('attention_is_all_you_need.xlsx', index=False)
raw_pdf_elements :
[<unstructured.documents.elements.CompositeElement object at 0x35524b590>,
 <unstructured.documents.elements.CompositeElement object at 0x30a24a650>,
 <unstructured.documents.elements.CompositeElement object at 0x3557f9090>,
 <unstructured.documents.elements.CompositeElement object at 0x355704650>,
 <unstructured.documents.elements.CompositeElement object at 0x355704fd0>,
 <unstructured.documents.elements.CompositeElement object at 0x3557055d0>,
 <unstructured.documents.elements.Table object at 0x30ef5d3d0>,
 <unstructured.documents.elements.CompositeElement object at 0x355706e10>,
 <unstructured.documents.elements.CompositeElement object at 0x30ef75290>,
 <unstructured.documents.elements.CompositeElement object at 0x30ef77650>,
 <unstructured.documents.elements.Table object at 0x30ef76290>,
 <unstructured.documents.elements.CompositeElement object at 0x3449ed510>,
 <unstructured.documents.elements.CompositeElement object at 0x3449edc50>,
 <unstructured.documents.elements.Table object at 0x3449efd10>,
 <unstructured.documents.elements.CompositeElement object at 0x355b57350>,
 <unstructured.documents.elements.Table object at 0x355b54c90>,
 <unstructured.documents.elements.CompositeElement object at 0x3559d2250>,
 <unstructured.documents.elements.CompositeElement object at 0x3559d1b50>,
 <unstructured.documents.elements.CompositeElement object at 0x107cd4350>,
 <unstructured.documents.elements.CompositeElement object at 0x307a4a010>]

<unstructured.documents.elements.ElementMetadata object at 0x32255e810>

20
unstructured.documents.elements.Table : Table
unstructured.documents.elements.CompositeElement : Text
추출된 요소를 dataframe에 넣고 excel로 출력해보면 Chunking 옵션에 맞게 추출된것을 확인할수있습니다.

from langchain_core.output_parsers import StrOutputParser
from langchain_core.prompts import ChatPromptTemplate
from langchain_openai import ChatOpenAI
import os

# OPENAI_API_KEY = os.getenv("OPENAI_API_KEY")
# Generate summaries of text elements
def generate_text_summaries(texts, tables, summarize_texts=False):
    """
    Summarize text elements
    texts: List of str
    tables: List of str
    summarize_texts: Bool to summarize texts
    """

    # Prompt
    prompt_text = """You are an assistant tasked with summarizing tables and text for retrieval. \
    These summaries will be embedded and used to retrieve the raw text or table elements. \
    Give a concise summary of the table or text that is well optimized for retrieval. Table or text: {element} """
    prompt = ChatPromptTemplate.from_template(prompt_text)

    # Text summary chain
    model = ChatOpenAI(temperature=0, model="gpt-4")
    summarize_chain = {"element": lambda x: x} | prompt | model | StrOutputParser()

    # Initialize empty summaries
    text_summaries = []
    table_summaries = []

    # Apply to text if texts are provided and summarization is requested
    if texts and summarize_texts:
        text_summaries = summarize_chain.batch(texts, {"max_concurrency": 5})
    elif texts:
        text_summaries = texts

    # Apply to tables if tables are provided
    if tables:
        table_summaries = summarize_chain.batch(tables, {"max_concurrency": 5})

    return text_summaries, table_summaries


# Get text, table summaries
text_summaries, table_summaries = generate_text_summaries(
    texts_4k_token, tables, summarize_texts=True
)
1. generate_text_summaries 함수는 텍스트 요소를 요약할지 여부를 나타내는 bool 플래그 summarize_texts와 함께 텍스트 및 테이블 요소 목록을 입력으로 사용합니다. 요약 작업을 위한 프롬프트 템플릿을 설정합니다.
2. Prompt template에는 검색에 최적화된 간결한 요약을 제공하도록 안내하는 assistant에 대한 instructions이 포함되어 있습니다.
3. 이 코드는 temperature 및 model variant("gpt-3.5-turbo-16k")과 같은 매개변수를 지정하여 OpenAI 모델과의 채팅 기반 상호 작용을 초기화합니다. prompt template, OpenAI 모델, 모델의 응답을 처리하기 위한 output parser로 구성된 요약 체인이 구성됩니다.
4. text element가 제공되고 요약이 요청되면 요약 체인이 텍스트 요소에 일괄적으로 적용됩니다. max_concurrency 매개변수는 OpenAI API에 대한 최대 동시 요청 수를 제어합니다.
5. table element가 제공되면 요약 체인이 유사하게 적용됩니다.
6. 마지막으로, 전처리된 text element (texts_4k_token), 테이블 및 텍스트 요소를 요약하는 플래그와 함께 generate_text_summaries 함수를 호출합니다.
import base64
import os

from langchain_core.messages import HumanMessage


def encode_image(image_path):
    """Getting the base64 string"""
    with open(image_path, "rb") as image_file:
        return base64.b64encode(image_file.read()).decode("utf-8")


def image_summarize(img_base64, prompt):
    """Make image summary"""
    chat = ChatOpenAI(model="gpt-4-vision-preview", max_tokens=200)

    msg = chat.invoke(
        [
            HumanMessage(
                content=[
                    {"type": "text", "text": prompt},
                    {
                        "type": "image_url",
                        "image_url": {"url": f"data:image/jpeg;base64,{img_base64}"},
                    },
                ]
            )
        ]
    )
    return msg.content


def generate_img_summaries(path):
    """
    Generate summaries and base64 encoded strings for images
    path: Path to list of .jpg files extracted by Unstructured
    """

    # Store base64 encoded images
    img_base64_list = []

    # Store image summaries
    image_summaries = []

    # Prompt
    from tqdm import tqdm
    import time

    prompt = """You are an assistant tasked with summarizing images for retrieval. \
        These summaries will be embedded and used to retrieve the raw image. \
        Give a concise summary of the image that is well optimized for retrieval."""

    count = 0

    for img_file in tqdm(sorted(os.listdir(path)), desc="Processing images"):
        if img_file.endswith(".jpg"):
            img_path = os.path.join(path, img_file)

            try:
                base64_image = encode_image(img_path)
                img_base64_list.append(base64_image)
                image_summaries.append(image_summarize(base64_image, prompt))
                count += 1

            except Exception as e:
                print(f"Error processing image {img_file}: {e}")

    return img_base64_list, image_summaries


# Image summaries
img_base64_list, image_summaries = generate_img_summaries("figures/")
1. encode_image 함수는 지정된 경로에서 이미지 파일을 읽고 이를 base64 문자열로 인코딩합니다. 인코딩된 문자열은 UTF-8 형식으로 디코딩된 후 반환됩니다.
2. image_summarize 함수는 base64로 인코딩된 이미지와 프롬프트를 입력으로 사용합니다. GPT-4 Vision 모델로 채팅 세션을 초기화하고 프롬프트와 base64 형식으로 인코딩된 이미지 URL을 모두 포함하는 메시지를 구성합니다.
3. generate_img_summaries 함수는 JPEG 이미지가 포함된 디렉터리를 처리합니다. 각 이미지 파일을 반복하여 base64 형식으로 인코딩하고 image_summarize 함수를 사용하여 요약을 생성합니다.
4. 프롬프트는 generate_img_summaries 함수 내에 정의되어 검색에 최적화된 간결한 요약을 제공하도록 assistant에게 지시합니다. tqdm 라이브러리는 이미지 처리 중에 진행률 표시줄을 표시하는 데 사용됩니다.
5. 마지막으로 이미지가 포함된 디렉터리 경로를 사용하여 generate_img_summaries 함수가 호출됩니다. 이는 이미지 요약을 위해 GPT-4 Vision 모델을 활용하여 각 이미지에 대해 base64로 인코딩된 이미지와 요약을 생성합니다.
import uuid

from langchain.retrievers.multi_vector import MultiVectorRetriever
from langchain.storage import InMemoryStore
from langchain_community.vectorstores import Chroma
from langchain_core.documents import Document
from langchain_openai import OpenAIEmbeddings


def create_multi_vector_retriever(
    vectorstore, text_summaries, texts, table_summaries, tables, image_summaries, images
):
    """
    Create retriever that indexes summaries, but returns raw images or texts
    """

    # Initialize the storage layer
    store = InMemoryStore()
    id_key = "doc_id"

    # Create the multi-vector retriever
    retriever = MultiVectorRetriever(
        vectorstore=vectorstore,
        docstore=store,
        id_key=id_key,
    )

    # Helper function to add documents to the vectorstore and docstore
    def add_documents(retriever, doc_summaries, doc_contents):
        doc_ids = [str(uuid.uuid4()) for _ in doc_contents]
        summary_docs = [
            Document(page_content=s, metadata={id_key: doc_ids[i]})
            for i, s in enumerate(doc_summaries)
        ]
        retriever.vectorstore.add_documents(summary_docs)
        retriever.docstore.mset(list(zip(doc_ids, doc_contents)))

    # Add texts, tables, and images
    # Check that text_summaries is not empty before adding
    if text_summaries:
        add_documents(retriever, text_summaries, texts)
    # Check that table_summaries is not empty before adding
    if table_summaries:
        add_documents(retriever, table_summaries, tables)
    # Check that image_summaries is not empty before adding
    if image_summaries:
        add_documents(retriever, image_summaries, images)

    return retriever


# The vectorstore to use to index the summaries
vectorstore = Chroma(
    collection_name="rag-storage", embedding_function=OpenAIEmbeddings()
)

# Create retriever
retriever_multi_vector_img = create_multi_vector_retriever(
    vectorstore,
    text_summaries,
    texts,
    table_summaries,
    tables,
    image_summaries,
    img_base64_list,
)
1. create_multi_Vector_retriever 함수는 텍스트 요약, 텍스트 내용, 테이블 요약, 테이블 내용, 이미지 요약 및 이미지 base64 인코딩 문자열을 포함하여 다양한 요약 및 해당 원시 콘텐츠를 입력으로 사용합니다.
2. 메모리 내 문서 저장소(store)를 초기화하고 지정된 벡터 저장소(vectorstore)를 사용하여 다중 벡터 검색기(retriever)를 설정합니다. id_key 매개변수는 검색기 내에서 문서를 식별하는 데 사용되는 키를 결정합니다.
3. 함수 내부에는 벡터 저장소와 문서 저장소 모두에 문서를 추가하기 위한 도우미 함수 add_documents가 정의되어 있습니다. 각 문서에 대해 고유한 UUID를 생성하고 요약이 포함된 문서 개체를 페이지 콘텐츠로 생성하여 벡터 저장소에 추가합니다. 또한 UUID를 키로 사용하여 원시 문서 내용을 문서 저장소에 추가합니다.
4. 코드는 해당 유형의 문서를 검색기에 추가하기 전에 각 유형의 요약이 비어 있지 않은지 확인합니다.
5. OpenAI 임베딩 기능이 포함된 Chroma 벡터 저장소를 사용하여 벡터 저장소(vectorstore)를 초기화합니다.
6. create_multi_Vector_retriever 함수를 사용하면 텍스트, 테이블 및 이미지에 대한 벡터 저장소와 요약/컨텐츠를 제공하여 다중 벡터 검색기(retriever_multi_Vector_img)가 생성됩니다.
import io
import re

from IPython.display import HTML, display
from langchain_core.runnables import RunnableLambda, RunnablePassthrough
from PIL import Image


def plt_img_base64(img_base64):
    """Disply base64 encoded string as image"""
    # Create an HTML img tag with the base64 string as the source
    image_html = f'<img src="data:image/jpeg;base64,{img_base64}" />'
    # Display the image by rendering the HTML
    display(HTML(image_html))


def looks_like_base64(sb):
    """Check if the string looks like base64"""
    return re.match("^[A-Za-z0-9+/]+[=]{0,2}$", sb) is not None


def is_image_data(b64data):
    """
    Check if the base64 data is an image by looking at the start of the data
    """
    image_signatures = {
        b"\xFF\xD8\xFF": "jpg",
        b"\x89\x50\x4E\x47\x0D\x0A\x1A\x0A": "png",
        b"\x47\x49\x46\x38": "gif",
        b"\x52\x49\x46\x46": "webp",
    }
    try:
        header = base64.b64decode(b64data)[:8]  # Decode and get the first 8 bytes
        for sig, format in image_signatures.items():
            if header.startswith(sig):
                return True
        return False
    except Exception:
        return False


def resize_base64_image(base64_string, size=(128, 128)):
    """
    Resize an image encoded as a Base64 string
    """
    # Decode the Base64 string
    img_data = base64.b64decode(base64_string)
    img = Image.open(io.BytesIO(img_data))

    # Resize the image
    resized_img = img.resize(size, Image.LANCZOS)

    # Save the resized image to a bytes buffer
    buffered = io.BytesIO()
    resized_img.save(buffered, format=img.format)

    # Encode the resized image to Base64
    return base64.b64encode(buffered.getvalue()).decode("utf-8")


def split_image_text_types(docs):
    """
    Split base64-encoded images and texts
    """
    b64_images = []
    texts = []
    for doc in docs:
        # Check if the document is of type Document and extract page_content if so
        if isinstance(doc, Document):
            doc = doc.page_content
        if looks_like_base64(doc) and is_image_data(doc):
            doc = resize_base64_image(doc, size=(1300, 600))
            b64_images.append(doc)
        else:
            texts.append(doc)
    return {"images": b64_images, "texts": texts}


def img_prompt_func(data_dict):
    """
    Join the context into a single string
    """
    formatted_texts = "\n".join(data_dict["context"]["texts"])
    messages = []

    # Adding image(s) to the messages if present
    if data_dict["context"]["images"]:
        for image in data_dict["context"]["images"]:
            image_message = {
                "type": "image_url",
                "image_url": {"url": f"data:image/jpeg;base64,{image}"},
            }
            messages.append(image_message)

    # Adding the text for analysis
    text_message = {
        "type": "text",
        "text": (
            "You are a deep learning and machine learning specialist.\n"
            "You will be given a mixed of text, tables, and image(s) usually of charts.\n"
            "Use this information to provide quality information related to the user question. \n"
            f"User-provided question: {data_dict['question']}\n\n"
            "Text and / or tables:\n"
            f"{formatted_texts}"
        ),
    }
    messages.append(text_message)
    return [HumanMessage(content=messages)]


def multi_modal_rag_chain(retriever):
    """
    Multi-modal RAG chain
    """

    # Multi-modal LLM
    model = ChatOpenAI(temperature=0, model="gpt-4-vision-preview", max_tokens=1024)

    # RAG pipeline
    chain = (
        {
            "context": retriever | RunnableLambda(split_image_text_types),
            "question": RunnablePassthrough(),
        }
        | RunnableLambda(img_prompt_func)
        | model
        | StrOutputParser()
    )

    return chain


# Create RAG chain
chain_multimodal_rag = multi_modal_rag_chain(retriever_multi_vector_img)
1. looks_like_base64 함수는 주어진 문자열이 base64로 인코딩된 문자열과 유사한지 확인합니다.
2. is_image_data 함수는 헤더를 검사하여 base64로 인코딩된 문자열이 이미지 데이터를 나타내는지 확인합니다.
3. resize_base64_image 함수는 base64로 인코딩된 이미지 문자열을 디코딩하고 이미지 크기를 조정한 후 이를 base64 문자열로 다시 인코딩합니다.
4. split_image_text_types 함수는 문서 목록을 내용에 따라 이미지 유형과 텍스트 유형으로 분할합니다. 각 문서에서 이미지와 유사한 base64 문자열을 확인하고 그에 따라 크기를 조정합니다.
5. img_prompt_func 함수는 RAG 모델 입력에 적합한 형식으로 사용자가 제공한 질문, 상황별 텍스트 및 이미지를 포함하는 메시지를 구성합니다. 컨텍스트 텍스트의 형식을 지정하고 이미지가 있는 경우 이미지 메시지를 추가합니다.
6. multi_modal_rag_chain 함수는 다중 모드 RAG 파이프라인을 구성합니다. 관련 컨텍스트 데이터를 가져오는 검색기, 전처리를 위한 람다 함수, 이미지 프롬프트 함수, GPT-4 Vision 모델 및 출력 파서로 구성됩니다.
7. 마지막으로 앞서 생성한 검색기로 multi_modal_rag_chain 함수를 호출하여 RAG 체인(chain_multimodal_rag)을 생성합니다.
# Check retrieval
query = "Can you give me a brief description on the document."
docs = retriever_multi_vector_img.get_relevant_documents(query, limit=6)

# We get 4 docs
len(docs)
검색 쿼리는 다중 벡터 검색기(retriever_multi_Vector_img)를 사용하여 실행됩니다. 쿼리에서는 문서에 대한 간략한 설명을 요청합니다. 검색기의 get_relevant_documents 메소드는 쿼리를 기반으로 관련 문서를 검색하는 데 사용되며 최대 6개의 문서가 지정됩니다.
# Run RAG chain
response = chain_multimodal_rag.invoke(query)
response = response.split('.')

# Print each line in a new line
for line in response:
    print(line)
The images you have provided appear to be visualizations of attention patterns from a machine learning model, likely from a neural network that processes natural language, such as a transformer-based model
 These types of visualizations are used to understand how the model is paying attention to different parts of the input text when making predictions or generating text


Each image shows lines connecting words in a sentence or phrase
 The thickness and color intensity of the lines indicate the strength of the attention the model is giving to those connections
 In other words, they show which words the model considers important when interpreting the meaning of a particular word


The first image with red lines shows a sentence that reads "The law will never be perfect, but its application should be just - this is what we are missing in my opinion <EOS>
" The attention patterns are dense, suggesting that the model is considering many different connections between the words


The second image with purple and brown lines shows a sentence that reads "It is in this spirit that a majority of American governments have passed new laws since 2009 making the registration or voting process more difficult <EOS>
" The attention here is focused on the latter part of the sentence, particularly on the words "making the registration or voting process more difficult
"

The third image with purple lines is a less intense version of the first image, showing the same sentence with a different attention pattern, possibly from another layer or a different model


The fourth image with green lines is another visualization of the first sentence, again showing a different pattern of attention, which could be from yet another layer or model


The "<EOS>" token typically signifies "End Of Sentence" in natural language processing, indicating the end of the input text for the model


These visualizations are useful for researchers and engineers to debug and improve the model's understanding of language, as well as to gain insights into how the model makes decisions based on the input text
이 코드 조각은 다중 모드 RAG 체인(chain_multimodal_rag)을 호출하여 지정된 쿼리에 대한 응답을 생성합니다. 쿼리는 제공된 컨텍스트와 질문을 기반으로 응답 생성을 트리거하는 체인의 invoke 메서드로 전달됩니다.
대화형 에이전트를 위한 Multi-modal RAG의 장점:
1. Enhanced Understanding: 다중 모드를 통합함으로써 Multi-modal RAG 모델은 사용자 쿼리의 뉘앙스와 컨텍스트를 더 잘 파악할 수 있습니다. 이미지의 시각적 단서나 문서의 추가 정보는 보다 관련성이 높고 정확한 응답을 생성하는 데 유용한 컨텍스트를 제공할 수 있습니다.
2. Richer Responses: 다양한 양식을 활용할 수 있는 능력을 통해 대화 에이전트는 더욱 유익하고 매력적인 응답을 생성할 수 있습니다. 시각적 설명 제공, 관련 문서 참조, 멀티미디어 콘텐츠 통합 등 Multi-modal RAG는 대화 경험을 풍부하게 할 수 있습니다.
3. Improved User Interaction: 다중 모드 상호 작용은 실제 커뮤니케이션을 더욱 밀접하게 모방하여 사용자 경험을 더욱 직관적이고 자연스럽게 만듭니다. 사용자는 텍스트, 이미지 또는 문서의 조합을 사용하여 에이전트와 통신할 수 있으므로 보다 유연하고 표현력이 풍부한 상호 작용이 가능합니다.
4. Broader Knowledge Integration: 다중 모드 표현을 활용하면 대화 에이전트가 더 넓은 범위의 지식 소스를 활용할 수 있습니다. 상담원은 텍스트 데이터에만 의존하는 대신 시각적 소스와 문서의 정보를 통합하여 지식 기반을 확장하고 응답 품질을 향상시킬 수 있습니다.
과제와 향후 방향:
Multi-modal RAG는 대화형 AI 발전에 큰 가능성을 갖고 있지만 잠재력을 최대한 실현하려면 몇 가지 과제를 해결해야 합니다.
1. Data Quality and Diversity: 고품질의 다양한 다중 모드 데이터 세트의 가용성을 보장하는 것은 강력한 모델을 교육하는 데 중요합니다. 이러한 데이터 세트를 수집하고 관리하는 것은 특히 다중 모드 데이터가 부족한 영역에서 중요한 과제를 제기합니다.
2. Model Complexity and Scalability: 여러 양식을 단일 모델에 통합하면 복잡성과 계산 요구가 증가합니다. Multi-modal RAG 모델의 확장 가능한 배포를 가능하게 하려면 효율적인 아키텍처와 교육 절차를 개발해야 합니다.
3. Ethical and Privacy Concerns: 대화형 에이전트가 다양한 데이터 유형을 처리하는 데 더욱 능숙해짐에 따라 사용자 개인 정보 보호를 보장하고 민감한 정보를 윤리적으로 처리하는 것이 가장 중요해졌습니다. 데이터 익명화 및 동의 관리를 위한 강력한 메커니즘이 필수적입니다.
4. Evaluation Metrics and Benchmarks: 다중 모드 대화형 AI 시스템에 대한 적절한 평가 지표와 벤치마크를 설정하는 것은 성능을 정확하게 평가하는 데 필수적입니다. 측정항목은 응답 관련성, 일관성, 다중 양식 통합과 같은 요소를 고려해야 합니다.
결론
Multi-modal RAG는 대화형 AI의 진화에서 중요한 진전을 나타내며 보다 몰입적이고 상황에 맞게 풍부한 상호 작용을 생성할 수 있는 잠재력을 제공합니다. 텍스트, 이미지 및 문서를 완벽하게 통합함으로써 Multi-modal RAG 모델은 사용자 쿼리를 보다 효과적으로 이해하고 유익할 뿐만 아니라 매력적인 응답을 생성할 수 있습니다. 과제는 여전히 남아 있지만, 이 분야의 지속적인 연구와 개발은 기계와 인간 사이의 인간과 같은 의사소통의 새로운 지평을 열어줄 가능성을 갖고 있습니다.
참고
https://unstructured-io.github.io/unstructured/core/chunking.html
https://unstructured.io/blog/optimizing-unstructured-data-retrieval
https://unstructured-io.github.io/unstructured/best_practices/table_extraction_pdf.html
https://github.com/SunGajiwala/langchain/blob/master/cookbook/Multi_modal_RAG.ipynb
따라하기
https://github.com/dongshik/Multi-Modal-using-RAG/blob/test/Multi_modal_RAG.ipynb
'AI > LLM' 카테고리의 다른 글
| spaCy를 이용한 Grammar Chunking 과 Text 정보 추출 (0) | 2024.08.16 |
|---|---|
| Multi Modal RAG를 위한 다중문서 처리 모듈 unstructured 살펴보기 (0) | 2024.05.07 |
| OpenAI LLM, FAISS , Langchain, streamlit 으로 RAG 구현 (1) | 2024.05.04 |
| M1 LM Studio를 위한 Command Line Tool lms 설치 (0) | 2024.05.04 |
| GPT-4 비전과 LLaVA (0) | 2024.05.04 |


